Reversing and Exploiting with Free Tools: Part 10
In the previous parts of this series, we went through some basic examples of exploitation and reversing. Now we’ll take a step forward, gradually adding different protections and mitigations that we will find.
What are mitigations?
Over the years, new generic defense methods have been added to new systems. While they don’t prevent exploitation, these mitigation techniques aim to make exploitation more difficult.
The first thing we will do is a simple 32-bit exercise, which is similar to the ones we saw in previous parts, but has the addition of DEP enabled protection. From there we will do a similar exercise in 64-bits, where DEP is enabled for all processes. This way, we’ll gradually learn how to manage the different types of scenarios.
What is DEP?
An excellent definition for DEP can be found on the Microsoft site:

The point is that if a process has DEP enabled, the memory areas used to input or manage data like heap or stack do not have permission to be executed. This means that they can only have, at most, read and write permission.
On the other hand, only the code sections of the executables and DLLs have permission to execute, which in turn do not have write permission.
In this way, it becomes difficult to be able to execute our own code. If we store our own code in a buffer that we want to execute and then it gives an error for not having execution permission when we attempt to so, we won’t be able to exploit it as we did in previous examples.
In other words, these are our permissions if a program has DEP enabled when it starts:
SECTIONS THAT HANDLE DATA = R or RW (non-executable, read and / or write-only)
CODE SECTIONS = X (executables)
While a program without DEP enabled would provide us with execution permissions:
SECTIONS THAT HANDLE DATA = RX o RWX (executables + read and / or write)
CODE SECTIONS = X (executables)
It’s also worth noting that on 64-bit Windows systems, 32-bit processes running on WoW64 behave as they would on a 32-bit system.
What is Wow64?
According to Wikipedia, WoW64 (Windows 32-bit on Windows 64-bit) is “a subsystem of the Windows operating system capable of running 32-bit applications on 64-bit Windows. It is included in all 64-bit versions of Windows—including Windows XP Professional x64 Edition, IA-64 and x64 versions of Windows Server 2003, as well as x64 versions of Windows Vista, Windows Server 2008, Windows 7, Windows 8, Windows Server 2012, Windows 8.1, Windows 10, Windows Server 2016, Windows Server 2019, and Windows 11, as well as ARM64 versions of Windows 10, Windows 11 and Windows Server 2022. In Windows Server 2008 R2 Server Core, it is an optional component. It is not available in Windows Nano Server variants. WoW64 aims to take care of many of the differences between 32-bit Windows and 64-bit Windows, particularly involving structural changes to Windows itself.”
To put it simply, it’s like having an emulator for a 32-bit Windows system running inside a 64-bit Windows system. If the WoW64 subsystem did not exist within 64-bit systems, we would not be able to run 32-bit applications on them.
All this is transparent to the user, who can execute a 32-bit or 64-bit process without having to carry out any additional steps. They just need to double click on an executable and the system will detect if it is 64-bit, in which case it will execute it directly. If it’s detected as 32-bits, the system will pass it to the WoW64 subsystem for it to run.
This means that all the executables we saw in previous parts of the series that were compiled in 32-bit were actually running on the WoW64 subsystem.
In regards to DEP, depending on how a program is compiled with or without DEP, programs compiled in 32-BITS or WOW64 will run with or without DEP respectively. For programs compiled in 64 BITS, they will always have DEP ENABLED no matter how they are compiled.
Of course, this is just the default system configuration, which can be changed. For example, in 32-bit systems there is the possibility to change all processes to have DEP enabled, just like the default configuration of 64-bit systems. However, for the sake of these exercises, we will always refer to each system with its options as they come by default.
In addition to all this there is a Windows function that a program can use to activate DEP at runtime in 32-bit processes.
What is SetDEPProcessPolicy?
To get the definition straight from the source, let’s refer to the documentation. According to Microsoft, SetProcessDEPPolicy “changes data execution prevention (DEP) and DEP-ATL thunk emulation settings for a 32-bit process.” We can see the syntax and parameters below:

The issue is that this function is typically only used to enable DEP. Since it only serves to disable DEP if it was enabled by the same function, DEP enabled with another method cannot be disabled using SetProcessDEPPolicy.
Since we have many different possibilities for a process to have DEP or not enabled, just statically seeing if an executable was compiled with DEP or not is not enough to know if it will finally be enabled when it runs.
Consequently, the best way to use the tool called Process Explorer, which is from Microsoft.
Once you’ve downloaded, you should have two version options:

For this exercise, let's run the 64-bit version with administrator permission. This will show all the processes on a machine that has a 64-bit Windows system, whether they are 64-bit or Wow64.

In the screenshot above, we can see the DEP column. Let’s see if the 64-bit processes are DEP enabled by adding the image type column.

This can be done by right clicking, the selecting the select columns option in the column bar.

With this column added, we can see that the 32-bit processes, which are running in WoW64, have DEP enabled in this case. But what about if we run one of the exercises that we completed in previous installments of this series?
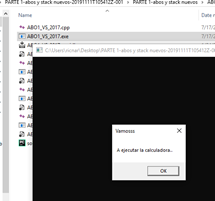
Let's look at this process in the Process Explorer.

This exercise was compiled in 32 bits and without DEP, so it will run without DEP enabled.
We’ll select the first exercise we see in the folder labeled PARTE 2.

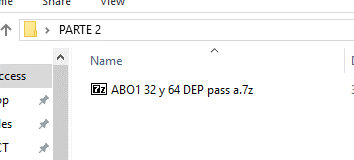
Decompressing the file will require you to enter a password. It is the lowercase letter a. Once this is completed, we can see there are the following two exercises.
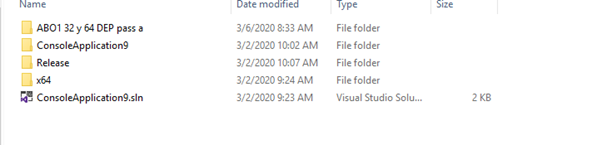
The same exercise has been compiled for both 32 and 64 bits. The compiled 32-bit version is located inside the Release folder. The compiled 64-bit version is located in the x64 folder.
The source code is the same for both files.

Let's run the 32-bit version using Process Explorer:


We can see that this exercise already has DEP enabled permanently. If we run the 64-bit version, it also has DEP enabled.

So our next objective will be attempting to bypass DEP. In order to accomplish this, we must study the technique called ROP.
What is ROP?
According to the OSIRIS Lab, ROP, which stands for Return Oriented Programming, “is the idea of chaining together small snippets of assembly with stack control to cause the program to do more complex things.”
In other words, it is technique of finding small pieces of code in the executables or DLLs of the process, using the code sections of the same process, that is, those allowed by DEP since they are marked as X or executables.
These pieces of code are called GADGETS.
What are ROP GADGETS?
ROP gadgets are short sequences of instructions that, once assembled, allow you to execute any number of tasks or code. ROP gadgets typically end with the ret instruction in order to combine multiple sequences.
Gadgets can they end in a RET (C3) or a RET C2 (RETN CONST). In some sophisticated cases they can even end in a CALL or JMP.
For this example, let’s make our gadgets build a call to a Windows function such as VirtualProtect or VirtualAlloc, which will allow us to give execution permission to a data section that did not have it initially. Alternately, it will allows us to create a new section that has read, write, and execute permission where we copy our code and then jump to execute it.
So, if we have a process with DEP enabled:
SECTIONS THAT HANDLE DATA = R or RW (non-executables, read and / or write-only)
CODE SECTIONS = X (executables)
We will be able to add X (execution) to some part of the memory.
SOME SECTION THAT HANDLES DATA = RX or RWX (we added execution already had read and / or write)
CODE SECTIONS = X (executables)
In other words, the way to bypass DEP is not to disable it for the whole process (which is actually not possible), but to instead add execution permission to some part of the memory that handles data in order to execute our code there.
The idea is that since we control and overflow the stack, we can jump to any direction we want. So instead of jumping as we did before to a CALL ESP, CALL EAX or a code that directly jumped to execute our code, we’ll jump for example to a gadget that makes POP ECX-RET.
This will execute POP ECX, which will copy the value that is stored in our controlled stack to ECX. Then the RET will make us jump to the next gadget, which we also control since it will be below the value that was copied to ECX.
This is the process for chaining the execution of gadgets. After executing the first gadget, the chain will continue with the second gadget and so on. Each gadget is moving the values that we need to each register to build a call to the VirtualAlloc or VirtualProtect function.
Obviously, this is just one example of chaining existing gadgets. There may be times that we will find the gadgets that we need in the modules that do not have randomization and have fixed addresses to jump to. Or it may need to be complemented with address leak techniques which will allow us to obtain module addresses to avoid ASLR. And sometimes, it will be much more difficult and you will have to dig deeper.
That is why ROP techniques take continuous practice. There is a lot of variation depending on the environment and the success of the exploit writer depends a lot on whether a successful ROP can be performed or not.
Reversing the 32-bit executable with DEP in GHIDRA
You can upgrade to the newest version right now:

Let’s delete the previous project and create a new one.

Then we’ll drag and drop the executable into the created project.


Once it parses, we can try to load the PDB with the symbols. However, it tells us we already loaded it, so we don't need to load them again.
Next, we’ll see the main function.

We can look for it using the built-in function search engine, and then double click it to go to the function.
We can see it in graphical mode with WINDOWS - FUNCTION GRAPH.

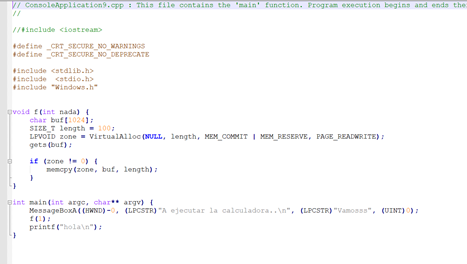
The function is a single block and we can see that there is nothing really here. There is only the call to MessageBoxA and then the call to the function f, which is where the overflow can be.

We can see that it is actually quite similar to the exercise we have already seen. While there are some differences, it is essentially a call to VirtualAlloc to reserve a given amount of bytes in memory, determined by the length argument passed there.

If we right-click on the length variable, we can see where it is used.


It marks the places where it is used, when it is written (WRITE), and the times that its value is read (READ).
We see that the first time it is accessed it saves the value 0x64, and then there are two more times when it is accessed to use the value. The first time it is accessed as an argument of VirtualAlloc. Next, it is used in memcpy to copy the data to that allocated memory of 0x64, entering the buffer by using gets.
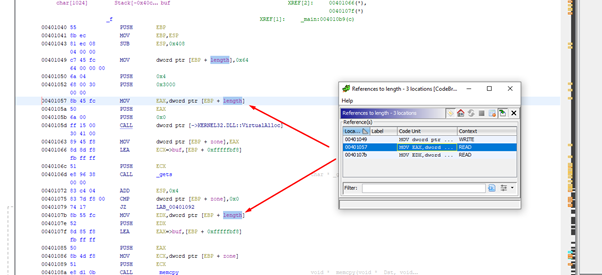
It also shows the references to the length variable.

With the use of gets we’ll have an overflow since it will copy without control.
There is no problem in the memcpy initially because even though the input buffer is bigger than 0x64 bits (as it only copies 0x64 bytes to a buffer with size = 0x64), there will be no overflow.
As long as the size to copy is equal to the size of the destination buffer, as it is in this case, there will be no overflow, since it will not copy more than the size of the buffer.
Next, we can decompile since GHIDRA has a decompiler.


We can see the function was decompiled almost exactly and illustrates what we discussed above: the call to VirtualAlloc reserves 100 bytes (0x64h). The only thing is that it does not use the length variable here, but instead replaces it with the constant 100 directly.

However, the overflow occurs in the gets function. The memcpy function is correctly used with a _Dst with a size of 100 bytes. The amount of copied bytes is also 100 bytes, so it will not overflow.
How many bytes must we copy to step on the return address?


We can see that there are three variables: buf, zone, and length. We also see that length is located below buf. While in the memcpy it only initially copied 100, it will be able to copy more by overflowing buf and smashing the value of length.
Below are the SAVED EBP and RETURN ADDRESS, each one consisting of 4 bytes.
We’ll change the type to DWORDS and then rename it.


Now it’s clearly displayed.
As in GHIDRA, the HORIZON is the value of ESP at the beginning of the function. Just below it will be the RETURN ADDRESS, which is offset 0x0. Additionally, there are 0x40c bytes just above.
In IDA the HORIZON is the value of EBP after being set in the PROLOGUE. If we and right click and select ARRAY, we’re shown that the data to fill just before the RETURN ADDRESS would be 1036 bytes.

The variable buf would be located in IDA at offset = - 0x408, since references are taken from EBP.
But GHIDRA is also using ESP as a reference also, so bear in mind that GHIDRA has this duality.


In the usage of the variable, it shows EBP-0x408. Taking EBP as a reference like IDA, but in the definition of the function and in the distances, it shows us 0x40C. This is the distance to ESP at the beginning of the function.
We must take this into account to avoid confusion.

If we add the lengths of the variables to fill until just before the RETURN ADDRESS it would be:
0x400 + 4 +4 +4 = 1036

So if one does not get confused and knows what they are doing, they’ll gets the same result in IDA as in GHIDRA.
If we didn't have DEP activated, the script to exploit this exercise would be as follows:

If we open it in x64dbg, we can use VIEW-MODULES to locate the executable.

We’ll need to search for and find a CALL EAX command in the executable. Since EAX remains with the address of buf, we’ll need to jump there to execute.


We could jump perfectly to execute by using any of those CALL EAX commands and placing the SHELLCODE at the beginning of the buffer (if it did not have DEP activated).
Let's try running it. We’ll attach the x64dbg and put a breakpoint when returning from the MessageBoxA, which will ensure that the program stops there.

Trace with F7 to enter function f.
As the buffer was filled with the shellcode and zeros to complete, the value of the flag, which makes it go to memcpy or not, is zero. This means it will jump above memcpy.
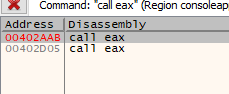
When we reach the return address, it points to CALL EAX.
If we keep tracing with f7, CALL EAX will be executed. This is because it is code that belongs to the code section of the executable module, which has execute permission.

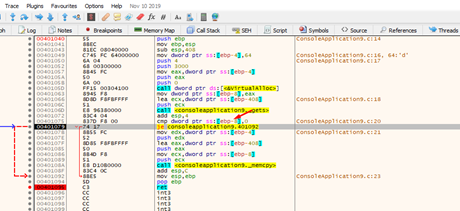
If we continue tracing with f7, we’ll reach the shellcode.

Even if we want to continue executing this code, it will crash here, since the stack does not have execution permission.

So it looks like it's game over. It will not execute the shellcode and it will close, which is what DEP protection is all about.
However, we saw that CALL EAX was executed. Since it belongs to the code section, it has execution permission, otherwise the program itself could not be executed.
Practice MINIROP
All of this is the basis of the ROP.
Knowing this, well want to write a script with a example mini ROP that sets these values:
EAX = 0x41414141 ECX = 0x42424242 EBP = 0x43434343
We can either find three gadgets:
- POP EAX-RET
- POP ECX-RET
- POP EBP -RET
Or we could also find a single gadget that sets multiple registers, for example:
POP ECX-POP EAX-RET
Let's see what we have found in the code.
We will use a FREE tool to find GADGETS which store all the gadgets of the module in a file.
This tool is called RP ++, and is available here:
https://drive.google.com/open?id=1M3LeiU5WzbsEqSnSwrEJupKCH_2wORnV
Let’s put the executable in the same folder to make it easier.

rp-win-x86.exe --file = ConsoleApplication9.exe --raw = x86 --rop = 4> pepe.txt I
We must use the 32-bit executable (rp-win-x86.exe) and look for 32-bit code (raw = x86). We’ll find a maximum of four instructions (rop = 4) and save in a file (pepe.txt).

Let’s search in NOTEPAD++ for all instances of POP ECX and see what comes out.

And now we have the gadgets:
- 0x00004828: pop eax; pop ebp; ret; (1 found)
- 0x000033e3: pop eax; pop ebp; ret; (1 found)
- 0x00005545: pop eax; pop ebp; ret; (1 found)
- 0x000108d9: pop eax; pop ebp; ret; (1 found)
- 0x00011126: pop eax; pop ebp; ret; (1 found)
- 0x000110ad: pop eax; pop ebp; ret; (1 found)
Also:
- 0x00004461: pop ecx; pop ebp; ret; (1 found)
- 0x0000447c: pop ecx; pop ebp; ret; (1 found)
- 0x00004c65: pop ecx; pop ebp; ret; (1 found)
- 0x00004e2b: pop ecx; pop ebp; ret; (1 found)
- 0x00007788: pop ecx; pop ebp; ret; (1 found)
- 0x000069d4: pop ecx; pop ebp; ret; (1 found)
- 0x00007648: pop ecx; pop ebp; ret; (1 found)
- 0x00009646: pop ecx; pop ebp; ret; (1 found)
And:
- 0x00000718: pop ecx; ret; (1 found)
- 0x000005dd: pop ecx; ret; (1 found)
- 0x00001820: pop ecx; ret; (1 found)
- 0x00002849: pop ecx; ret; (1 found)
- 0x00003d06: pop ecx; ret; (1 found)
- 0x000038da: pop ecx; ret; (1 found)
- 0x000044b9: pop ecx; ret; (1 found)
- 0x00004592: pop ecx; ret; (1 found)
- 0x000048c7: pop ecx; ret; (1 found)
- 0x000049f2: pop ecx; ret; (1 found)
- 0x00004a4d: pop ecx; ret; (1 found)
- 0x00004d55: pop ecx; ret; (1 found)
- 0x00004dfc: pop ecx; ret; (1 found)
We can build the rop with those gadgets to test. However, the problem is that this tool returns the file offset, since it opens the file statically.
Luckily, in previous parts of this course, we have already seen how to calculate the virtual memory address from the file offset.
If we want to do it quickly with the x64dbg, select GOTO-FILE OFFSET and enter the file offset of the gadget to get the virtual address.

Let’s attempt to calculate it. We see with rabin2 that the code section begins at 0x400 on disk, so subtracting from the value of the file offset - 0x400 gives us the offset within the start of the first section on disk. Adding where the code section begins in memory (the image base plus the size of the header 0x401000) should give us the virtual address.

0x4592- 0x400 + 0x401000 = 0x405192

We’ll want our ROP to set these values:
EAX = 0x41414141 ECX = 42424242 EBP = 43434343 I will
We’ll also use this other gadget:
0x00005545: pop eax; pop ebp; ret; (1 found)
virtual address = 0x406145
hex (0x5545- 0x400 + 0x401000)
'0x406145'
The script can be seen in the image below:

There we see the two gadgets with the values interspersed, which it will read with the POPs and move to the registers.
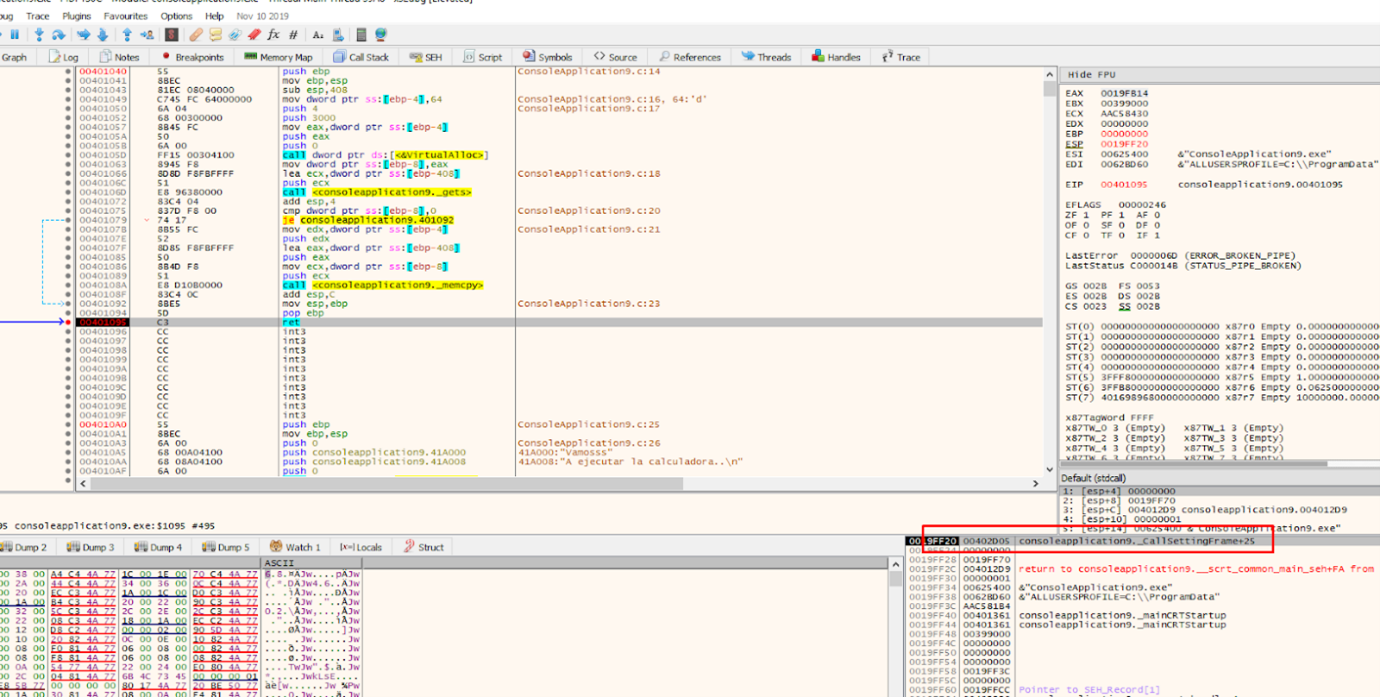
Let's run it to see if we got what we wanted.
When we get to the RET and can see our ROP, we can trace it with f7.

The first gadget is POP ECX-RET.

It moves the value 0x42424242 to ECX with the POP ECX. When we reach the ret instruction the next gadget will be executed.

Now the second GADGET is being executed.
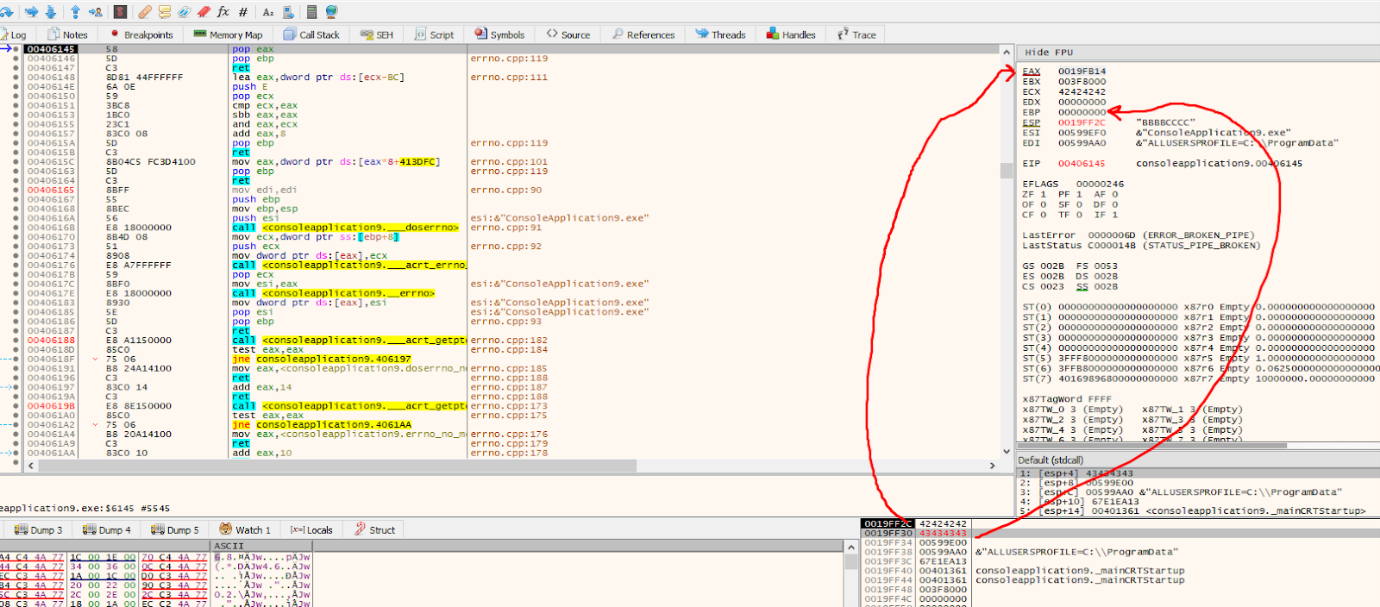
It will move 0x42424242 to EAX and 0x43434343 to EBP.

We can see that we managed to chain several GADGETS, and put the values we wanted in the registers where we needed them.
And if we wanted, we could continue to put more GADGETS underneath and do different things.
This is a great stopping point. In part 11 we will see the complete ROP bypass the DEP for this exercise.

Explore the Rest of the Reversing & Exploiting Series
Head to the main series page so you can check out past and future installments of the Reversing & Exploiting Using Free Tools.