Reversing & Exploiting With Free Tools: Part 7
In part 6, we learned how to understand a shellcode and its resolver. Now, we will continue with the analysis and resolution of abo2 in GHIDRA.
Download ABO2 executable. The latest version is on Google drive.

You can find the 7zip compressed file the executable (.exe extension), the symbols (.pdb extension), and the source code (.c extension).

Download the latest version of Ghidra. At the time of this writing, we’re using version 9.1.1.
Next, download the latest version of JDK. At the time of this writing, we’re using version 11.

Once on the webpage, download the MSI file and install it. Make sure you check the option to add binary to the PATH environment variable.

If you don’t yet have it, download MSDIA from github, which enables Microsoft PDB support in Ghidra.
Execute the bat file in a console (CMD) as an administrator.

The bat file only copies the file msdia140.dll from the compressed file that we downloaded to system32.
xcopy msdia140.dll %systemroot%\system32
It then it registers it:
regsvr32 %systemroot%\system32\msdia140.dll
Once the file is copied to system32 it can also be registered by dragging themsdia140.dll file and dropping it on the regsvr32.exe file that is located in the same folder.
Ghidra will now run without issue.
Next, let’s go to FILE-NEW PROJECT and create a new one.


We’ll double-click in the .exe name.


Go to the menu WINDOW-FUNCTIONS. We’ll use a filter to type the function we want to search. In this case, we want to search main. In the function list, we’ll double-click on the main that appears.
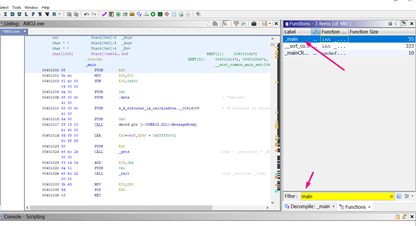
If we go to WINDOW-FUNCTION GRAPH, there isn’t much to show, since there is only a single block.

While it looks similar to ABO1, once we do an analysis, we’ll see this isn’t the case.
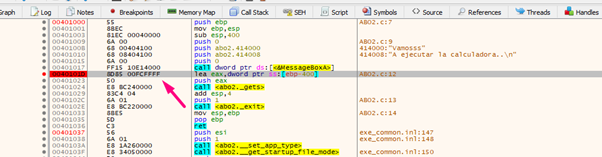
First, let’s decompile with WINDOW-DECOMPILE or CTRL+E.

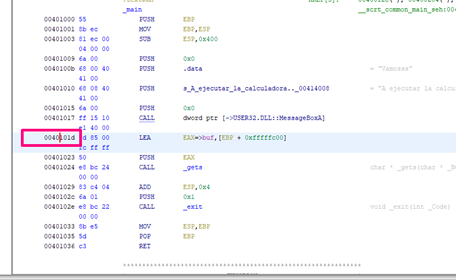
We see that there is a buffer of 1024 bytes.
The address of buf is given to EAX, and is then pushed. This will be the argument of the gets function.

Of course, the buffer called buf will be filled and will begin overflowing after 1024 bytes.
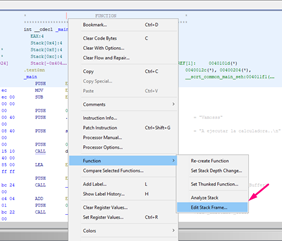
To make this menu appear, right-click the word FUNCTION.

We can change data types by pressing the B key, where the stored ebp and the return address should be stored so they are both DWORDS.

Remember, GHIDRA has a particular way of displaying stack variables.

With all functions based on EBP, the register is taken as a reference so that the horizon should be zero and in the red line. In this instance, because it takes the ESP value at the beginning of the function as a reference, it’s moved 4 bytes from what we are used to working with IDA or others disassemblers. This means that, while working in GHIDRA, the STORED EBP is in -4.
Here we can see it in IDA correctly: the STORED EBP s is at 0 because that is where the horizon is. (Remember that with PUSH EBP, STORED EBP is saved on top of the stack, then the function’s EBP is set to the current value of ESP. In the picture above, the red line is in IDA, which, taken as a reference, is what we call the HORIZON.)

Either way, we can see that in order to modify the return address, we have to send 0x404 bytes and then the value.
In GHIDRA the buf’s offset is -0x404, and the stored ebp is -4, so if we subtract one from the other, we can determine that buf size is 0x400.
We can then add 4 bytes from the stored ebp, which would then be the return address. This means a possible payload would be:
payload = b"A" * 0x404 + struct.pack("<L",0x41414141)
Next, let’s run through how to modify the return address with 0x41414141.

In IDA, let’s first select the area to fill, and then right click –ARRAY. This shows us the size element of array 1 and length 1028.
So if 1*1028 = 1028, that is 0x404 bytes in hexadecimal, meaning it’s the return address.

Since this is apparently similar to ABO1, we only need to find the CALL EAX to jump to execute the shellcode.


The search brings up a couple of instances of CALL EAX.

If we execute from a console, we’ll find that it doesn’t pop open a calculator, it only closes out.
Next, we’ll have to debug with x64dbg. We’ll execute the .py from a console.
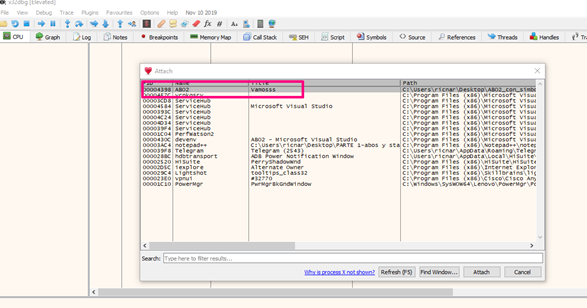
When the MessageBoxA appears, attach with x64dbg for 32 bits.


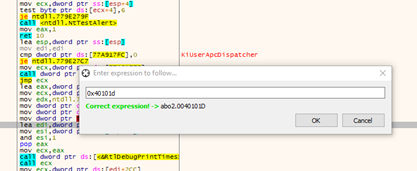
Let’s search for the address in GHIDRA to set a breakpoint after the call to MessageBoxA. The address is 0x40101d.
We’ll then look for it in x64dbg by right clicking - GOTO EXPRESSION.
Let’s set a breakpoint there. We’ll accept the MessageBoxA, which will make it stop there:

Since we know that EBP is the horizon, we can right-click on EBP-FOLLOW IN STACK.

The horizon will be on the line. The STORED EBP will be beneath it, and then the RETURN ADDRESS, where it should return after executing main. If the gets are not called, it will be the original RETURN ADDRESS of 0x4011f6.
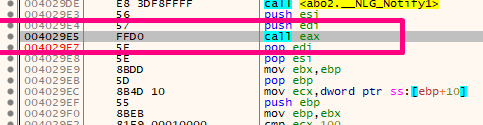
If we trace with f8 and go through gets(), we can see what happens with RETURN ADDRESS.

After stepping over with f8, we can once again set the horizon using EBP-FOLLOW IN STACK. We’ll see that RETURN ADDRESS was correctly modified with the value 0x4029e5, which pointed to CALL EAX.

Since the RETURN ADDRESS isn’t the issue, let’s continue tracing until we get the RETN of the function.
We’ll see that before of getting the RETN instruction, there’s a CALL EXIT that ends the program.

So, even if we modified the RETURN ADDRESS we can’t get the RETN instruction to modify the control flow to the CALL EAX, since it closes before it can complete. Knowing this, we can conclude that this is not a valid way to exploit the program.
EXPLOITING SEH IN 32 BITS
It may be possible to exploit 32 bits by modifying the exception handler or SEH that is stored in the stack.

TIB
Let’s recall the TIB structure in 32 bits from part 6. We can see that FS:[0] is the stack address where the first of the chained structures would be housed.
Note that TIB or TEB can be used interchangeably. Both are same value since TIB is the first field of the TEB structure.

We’ll see the TEB structure and its first field. As stated earlier, the first field is the TIB structure, so the memory address will the same:
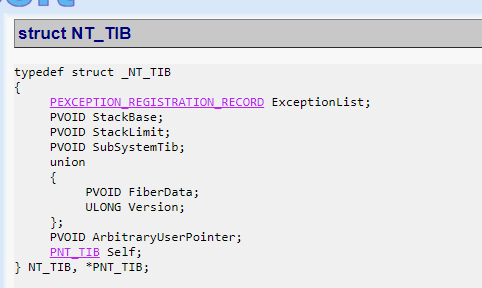
The first field contains the ExceptionList, which is a pointer on the stack where the EXCEPTION REGISTRATION RECORDS chain begins.
SEH CHAIN
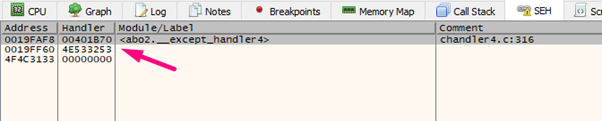
Next, let’s go to VIEW - SEH CHAIN in x64dbg.
We’ll find the EXCEPTION REGISTRATION RECORDS structure on the stack.


There, we’ll see the address 0x19ff60, which is the value we can see in fs:[0]. This is the same as the first field of the TIB.
![fsL [0]](/sites/default/files/2021-02/Reversing_and_Exploiting_Free_Tools_Part_7_Image_42_fs_0_command_paused.png)
So, the first field in the TIB structure is 0x19ff60, which is a pointer to the first EXCEPTION REGISTRATION RECORD structure on the stack.

The main takeaway here is that the EXCEPTION REGISTRATION RECORD structures are 8 bytes long and made of two pointers. The first one is called NEXT, which points to the next exception structure, and the second one is the value of the SEH (the function handler).
NEXT AND SEH
Looking closer, we can see the first DWORD is the NEXT that points to the exception structure, and the second DWORD is the SEH or HANDLER.
The last one points to the function that will be called when an exception happens in the program.

The NEXT points to the next EXCEPTION REGISTRATION RECORD structure. In this instance, it is 0x19FFCC.
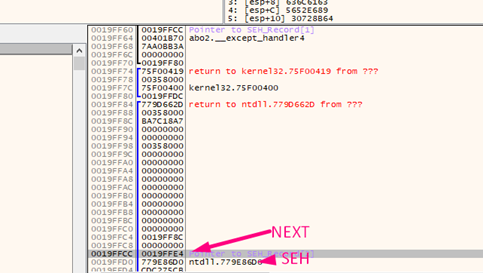
As we saw earlier, each EXCEPTION REGISTRATION RECORD structure points to the next one. This means that the next one will be0x19FFE4.

The last NEXT in the chain is 0xFFFFFFFF, located below the last SEH.

We can see that the list that shows the x64dbg of each EXCEPTION REGISTRATION RECORD structure is correct. In the first column there are the addresses of each structure, from the first one pointed to by FS:[0], to the last one that has NEXT=0xFFFFFFFF. The second column lists the handlers or SEH.
We have already seen that the NEXT field of each structure points to the next EXCEPTION REGISTRATION RECORD structure, but what is the SEH or HANDLER, and are we able to modify it on the stack? What would happen if we were able to modify it?
If we only modified the SEH, nothing would happen. We should try to make the program crash so if it tries to manage the exception it will jump to the address of our controlled SEH. We can fill the stack, writing until it finishes its section, which will overflow it, and eventually crash the program. This would produce an exception. If we have any SEH modified with a value that we control, catching the exception and trying to continue the program will make it jump wherever we want!

Let’s try it.
First, we’ll include a random byte string, big enough (0x2000) to overflow the stack and crash the program. We’ll need to create it as a string and then convert it to bytes in order for it to work properly. We’ll add it using with res.encode().
Next, we’ll run the script and attach x64dbg when exiting out of MessageBoxA.

When it stops at the breakpoint, we’ll trace with F8. If we try to step over gets the program will crash. This is because stepping over gets will copy more bytes than the stack allows, leaving no writable sections.

The image below shows the exception:

Let’s look at the VIEW - SEH CHAIN exception list.
We can see that the middle exception has been modified. Let’s go to the stack to see 0x19ff60:

The NEXT of this structure has also been modified. In this instance, The NEXT with 0x4f4c3133 and the SEH with 0x4e533253.

We can see the ASCII characters of the bytes that modified SEH.
We’ll copy and paste it into a NOTEPAD with the output from the console.\

Then we’ll search those ASCII values in the string that printed to see its location:

Since the stack shows DWORDS, which have already inverted what is in memory for the little endian, those bytes will be reversed.
We’ll copy the string until just before the values that modified the SEH:

And then we’ll paste it into len() in PYCHARM between quotations to find the length:

This means that the SEH begins after the 52nd random byte.

Replace the random bytes for 52 * “A” and then we’ll also will modify the SEH with “BBBB.” We’ll then fill the stack until it crashes.
Let’s execute it again and see how the SEH was modified after crashing:

We can see that NEXT is modified with 0x41414141 and SEH with 0x42424242.

If we press SHIFT + F9 to manage the exception it would jump to 0x42424242. However, there is no code there. Let’s try it and see:

It jumps to 0x42424242 but since there’s no code, it shows nothing.

The NEXT in this instance is 0x19ff60. After managing the exception so that it’s not obviously a direct jump, it jumps to the system. After many checks, it then jumps to the SEH.
After we’ve jumped, we can see that in the third position of the stack it ALWAYS leaves the NEXT. This is because of the design of the 32-bit exception handler.

The simplest approach would be to leave in the SEH, a pointer to a code with two POPS, and one RET. Once it jumps there, we can use the two POPS to remove the two first DWORDS from the stack. The RETN allows us to jump to the NEXT that it is in the third position.
Let’s search for the POP POP RET in the code.
After searching a little bit we can see a POP POP RET in 0x40345b.

We’ll replace the “BBBB” that modified the SEH with 0x40345b.

Let’s see what happens.
We’ll attack with x64dbg.
When it crashes, we’ll go to the SEH:

We can see it’s been modified with 0x40345b.
Let’s set a breakpoint there before we jump.

Now SHIFT + F9 to manage the exception and jump to 0x40345b.

We’ll see that it arrived to the first POP, which will remove the first value from the stack. The second POP will remove the second, and will then get the RETN.
We’ll jump to the NEXT by pressing F7.

We’ll now execute code (note that there’s no DEP in the binary), and since the 41414141 located in NEXT are our value, we can control and change them. This is necessary because the SEH bytes are located right below.
Remember, we are in the stack. This means the 41 41 41 41 are the NEXT and after that is the 5b 34 40 00, which is the reversed SEH (0x0040345b). We have to jump over there because there are not valid instructions, which can cause it to crash. Right below that, we can put whatever code we want.
So let’s modify the NEXT to “\xeb\x06\x90\x90,” which is a direct jump.

In the image below, the SEH is outlined in pink, and the NEXT is outlined in yellow. It’s inside of the 52 ‘A’s so we need to write only 48 ‘A’s and the 4 bytes to maintain the 52 bytes from before:

Let’s see what happens next:

We can see that EB 06 90 90 created a jump to avoid the SEH and reach the ‘B’ (0x42) that is right below where we will can write our shellcode:

This may work but we’re still missing something:

We see that it executes the shellcode and will pop the calculator. However, the problem is that once it finishes, it will crash. This causes it to jump again to the SEH and execute the shellcode again. This will continue indefinitely, popping open thousands of calculators.
So we’ll need to set a jump to exit after the shellcode.

We can see that there’s now a call to exit the program:

If we add those bytes after the shellcode it will jump to exit.

And now we’ll execute it.

This technique has some restrictions. It can only be executed in modules that are compiled with SAFE SEH OFF.
There’s a POWERSHELL script that checks the state of SAFE SEH here:
https://github.com/NetSPI/PESecurity
So we need to open a powershell console and go into the folder with the script:
Import-Module .\Get-PESecurity.psm1
Get-PESecurity -file .\ABO2.exe
If ABO2.exe is in another folder write the complete PATH.

This means we can jump to this module. In other case we will have to search another module without SAFE SEH in order to jump.
Now, we already have ABO2 and we’ve now seen how to exploit SEH in 32 bits. This method doesn’t work in 64 bits because the exception handler is not in the stack.
Interested in learning more penetration testing techniques?
Read our article, Reading DPAPI Encrypted Keys with MimiKatz, and learn how this technique can help in gaining access to the secrets of any user within the domain, either by compromising the victim’s workstation or through using domain controllers, once Domain Admin privileges are obtained.