Lately, there has been an important increase in the relevance of valid call stacks, given that defenders have started to leverage them to detect malicious behavior. As several implementations of “Call Stack Spoofing” have come out, I decided to develop my own, called Hardware Call Stack.
Call stack spoofing 101
To create a credible call stacks, I decided to use the technique developed by William Burgess at CallStackSpoofer.
For an in-depth explanation of the technique, I highly recommend reading his post. Below, I explain the main idea behind it.
At the start of every function (known as the prolog), space is made on the stack so that it can fit all the local variables, save registers, store the arguments for the functions it calls, etc. At the end of the function (known as the epilog), the stack is restored as it was before and then returns to the calling function.
On Windows x64, there is a directory called Exception Directory on every PE that stores all the stack operations performed by every function. By parsing this information, one can calculate how much stack space each function needs.
Suppose we want to create a call stack that simulates function A calls function B which then call a function C. The sequence would look like the following:
NTSTATUS C(void)
{
   return NtSomeSyscall(...);
}

NTSTATUS B(void)
{
    return C();
}

NTSTATUS A(void)
{
    return B();
}
We would need to know the size of the stack frame for each of these functions. If function A needs 0x50 bytes, function B 0x70 and function C 0x100, we will need to create the following stack:
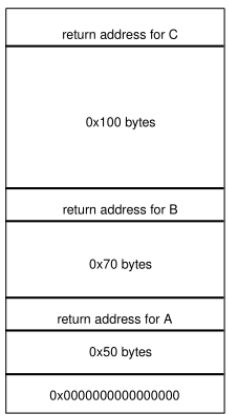
If we call a syscall using this fake stack, after it has finished, it will try to return to function C, which didn’t actually call the syscall, and crash. CallStackSpoofer gets around this issue using a clever approach. First, it creates a new thread. It sets up the fake call stack, preparing all the arguments and the target address to the syscall instruction. When the thread inevitably crashes while trying to return, an exception handler is used to redirect it to RtlExitUserThread.
An overview of the ‘Hardware Call Stack’ technique
As a challenge, I decided to make the entire process work within a single thread. To achieve this, I use a hardware breakpoint (hence the name of the technique) to prevent the thread from crashing while trying to return.
In a nutshell, the technique works like this:
-
Create the fake call stack
-
Set a hardware breakpoint at the “ret” instruction after the syscall
-
Set all the syscall parameters
-
Set the RSP register to the fake call stack
-
Jump to the “syscall” address
-
Once the syscall is done and the hardware breakpoint handler is hit, restore the stack and instruction pointers
-
Remove the hardware breakpoint
-
Profit
Sysmon is not fooled so easily
After confirming on WinDbg that everything was working properly, I opened up Sysmon and saw that it had failed to retrieve my fake call stack.
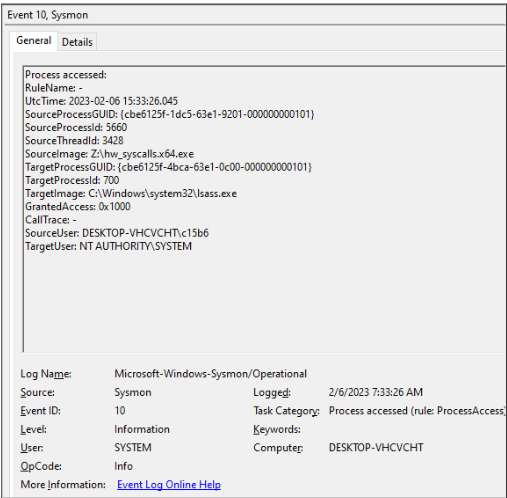
After some testing, I realized the problem. In order to create the fake call stack, I simply allocated some memory on the heap and while WinDbg has no issues with interpreting a call stack that is placed on the heap, Sysmon does.
So, if we want Sysmon (and potentially other security tools) to interpret the fake call stack correctly, then the fake stack needs to be placed on the actual stack region assigned to the calling thread.
This can obviously be tricky, because we do not want to risk a stack overflow by placing the fake stack too high up, and we do not want to overwrite our real stack by placing it too far down.
Find the base of my stack by parsing my own Exception Directory
If we can calculate the size of the stack frame for each function in our fake call stack, why don’t we use the same technique to calculate the size of our own stack?
To start, get the values of RSP (the stack pointer) and RIP (the instruction pointer) and ask, what is the size of the stack frame for the function at RIP?
Then, add the frame size to RSP, get the return address, ask the size of that stack frame on that function and repeat until the return address is 0x0 because at that point, you have a pointer to the bottom of the stack.
The code for that would look something like this:
VOID get_stack_space_in_use(
    PVOID* pstack_top,
    PULONG64 pstack_space)
{
    PVOID rsp = NULL;
    ULONG64 stack_space = 0;
    PVOID stack_top = get_rsp();
    PVOID ret_addr = get_rip();
    ULONG64 stack_frame_size = 0;

    rsp = stack_top;
    stack_frame_size = calculate_function_stack_frame_size(ret_addr);
    stack_space += stack_frame_size;
    rsp += (ULONG_PTR)stack_frame_size;
    ret_addr = *((PVOID*)((ULONG_PTR)rsp - 0x8));


    while (ret_addr)
    {
        stack_frame_size = calculate_function_stack_frame_size(ret_addr);
        stack_space += stack_frame_size;
        rsp += (ULONG_PTR)stack_frame_size;
        ret_addr = *((PVOID*)((ULONG_PTR)rsp - 0x8));
    }

    *pstack_top = stack_top;
    *pstack_space = stack_space;
}
The problem with placing the fake stack at the bottom address of the real stack is that you would be overwriting valuable information. To account for that, I decided to create a backup of it before calling the syscall and restore it after it has returned.
This worked well while running the binary but when I tried to reflectively load my PE with donut, the Windows API RtlLookupFunctionEntry (used to calculate the size of the stack frames) failed.
The API internally calls RtlLookupFunctionTable which, given the function pointer provided by the user, returns the Exception directory of the DLL where that function is defined. But first, it needs to find the base address of the DLL. To do that, it calls RtlPcToFileHeader which goes over the linked list of loaded DLLs on the PEB looking for a DLL with an address space that includes the user-provided pointer.
Given that I reflectively loaded the PE, and I did not add it to the linked list of loaded modules (like DarkLoadLibrary does), the function failed.
We can get around this limitation by implementing all the relevant functions ourselves, borrowing the code from the implementation of ReactOS and adding support for modules that are not on the loaded modules list.
After implementing RtlLookupFunctionTable, it still failed. The problem was that when you reflectively load a PE, the Exception directory is not present, which seems to suggest that Windows initializes this directory every time it loads a PE into memory. Since reverse engineering and implementing this process was outside of the scope of this project, I moved on.
Get the address of the stack using the TIB (Thread Information Block)
After the earlier idea failed, I thought I was doomed to use VirtualQuery to find the address of the stack. I wanted to avoid that in order to minimize my interaction with the OS and luckily, it turns out that there is a much simpler way to get this information. The addresses of the top and bottom of the stack are stored at the TIB (Thread information Block) as StackLimit and StackBase, respectively, and can be read easily with a few assembly instructions.
Now that we have a reliable way of knowing where the stack is, where should we put the fake stack exactly?
Here it is a typical memory layout of a Windows x64 process:
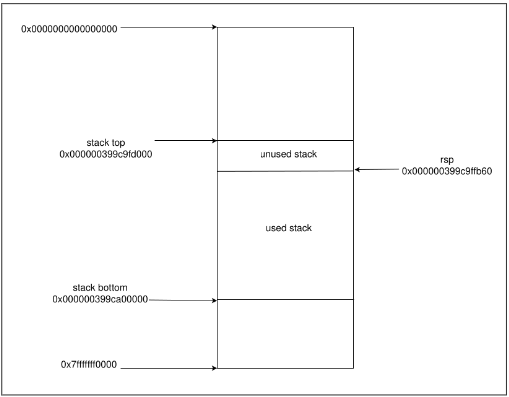
We could put it anywhere in between the stack top (0x399c9fd000) and the stack bottom (0x399ca00000). Something important to consider is that when the breakpoint is hit, Windows will call several internal functions before reaching our handler, which will push the fake stack further up.
As there is no straightforward way to know by how much will Windows increase the size of the fake stack, I decided to put it at the bottom of the real stack, effectively making it impossible to trigger a stack overflow.
However, this means that an unknown number of bytes of the real stack will get overwritten. To account for this, I first create a backup of the entire stack, call the syscall and then restore the entire stack. This way, there is no risk of stack overflow and not a single byte of the real stack will be left overwritten.
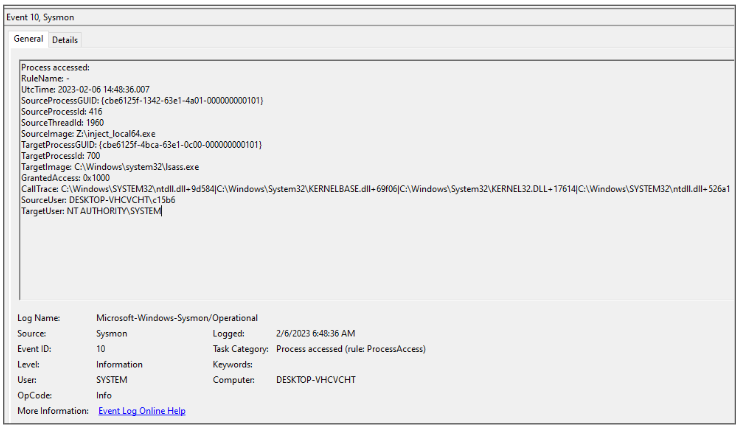
To test this, I loaded my binary in memory using donut, opened a handle to LSASS and confirmed that Sysmon parsed the fake call stack correctly.
Restoring the state of the thread after the syscall
Once the syscall has returned and the hardware breakpoint is hit, to restore the state of the thread, the handler needs to know the address of the stack backup, the value of the non-volatile registers before the syscall was triggered, and the address where execution should return to, among other things.
Given that depending on how you are running your implant, you might not have access to global variables, I did not want to use them to pass on all of this to the handler.
To communicate all the necessary information, these values are stored on the heap and a pointer to the base of the allocation is stored at the bottom of the fake stack, after a canary value of 0xDEADBEEFCAFEBABE.
So, when the handler is called, it searches downwards from the stack pointer (RSP) until the canary value is found. Immediately after the canary, the handler will obtain the heap pointer that stores all the information it needs so that it can restore the execution state and successfully return from the syscall.
Passing arguments by reference
Assume you want to call NtOpenProcess, you would normally do something like the following:
NTSTATUS status = STATUS_UNSUCCESSFUL;
HANDLE hProcess = NULL;
ACCESS_MASK DesiredAccess = PROCESS_QUERY_LIMITED_INFORMATION;
OBJECT_ATTRIBUTES ObjectAttributes = { 0 };
CLIENT_ID uPid = { 0 };
uPid.UniqueProcess = (HANDLE)(DWORD_PTR)1337;
uPid.UniqueThread = (HANDLE)0;

InitializeObjectAttributes(
    &ObjectAttributes,
    NULL,
    0,
    NULL,
    NULL);

    status = _NtOpenProcess(
    &hProcess,
    DesiredAccess,
    &ObjectAttributes,
    &uPid);
However, there is an interesting caveat with this technique. Because we are passing hProcess, ObjectAttributes and uPid by reference, we only pass a pointer to the syscall, while the actual value is stored on the stack, which might be overwritten by the fake stack and thus make our syscall fail.
To get around this, one must simply store these values in the heap so that there is no risk of them being overwritten.
NTSTATUS status = STATUS_UNSUCCESSFUL;
PHANDLE hProcess = intAlloc(sizeof(HANDLE));
ACCESS_MASK DesiredAccess = PROCESS_QUERY_LIMITED_INFORMATION;
POBJECT_ATTRIBUTES ObjectAttributes = intAlloc(sizeof(OBJECT_ATTRIBUTES));
PCLIENT_ID uPid = intAlloc(sizeof(CLIENT_ID));
uPid->UniqueProcess = (HANDLE)(DWORD_PTR)1337;
uPid->UniqueThread = (HANDLE)0;

InitializeObjectAttributes(
    ObjectAttributes,
    NULL,
    0,
    NULL,
    NULL);

    status = _NtOpenProcess(
    hProcess,
    DesiredAccess,
    ObjectAttributes,
    uPid);
Following this approach every time you pass a parameter by reference, will ensure that it always works as expected.
What about image loads?
While calling syscalls with valid call stacks is great, being able to call LoadLibraryA with a credible call stack is also highly desirable.
Luckily, with a few adjustments, it was possible to make this technique flexible enough so that you can call both syscalls and windows APIs with valid call stacks.

Defining your own call stack
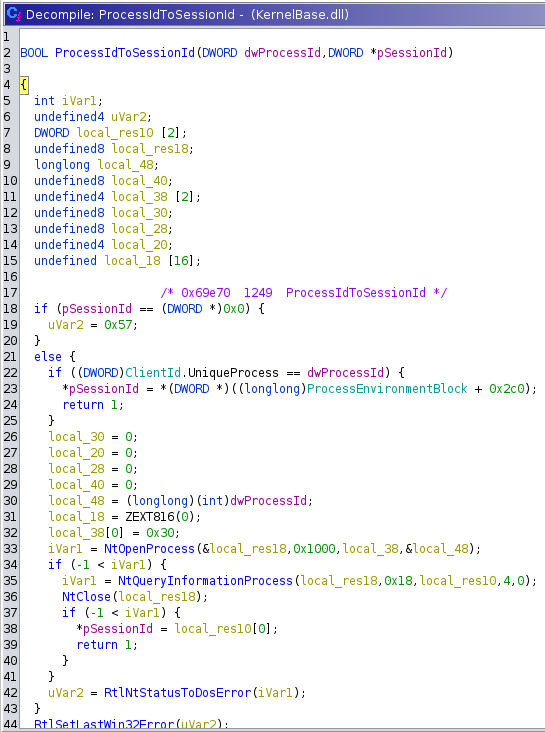
If you want to call NtOpenProcess in a way that seems harmless, you could go to Ghidra, load ntdll, Kernel32 and KernelBase and look for references to that syscall.
Here I found that ProcessIdToSessionId, from KernelBase, calls it.
The documentation from Microsoft states:
Retrieves the Remote Desktop Services session associated with a specified process.
As it sounds harmless enough, let’s use it on our fake call stack.
We want our frame to have as return address the instruction that is immediately after the call instruction at 0x180032e2f. To do just that, we need to define three things:
-
The DLL where the function is defined (KernelBase)
-
The name of the exported function which calls the syscall (ProcessIdToSessionId)
-
The instruction that is after the call to the syscall
The third step is the most complicated and error prone. Given that DLLs vary from version to version, we need to identify the instruction in such a way that is valid across all versions.
The call instruction consists of 7 bytes: 48 ff 15 22 c8 18 00. If we disassemble these bytes, we get that it translates to the following instruction: call QWORD PTR [rip+0x18c822].
This is simply a call to the function that is defined at the current instruction plus 0x18c822 bytes. As this exact offset is likely to vary from version to version, let’s ignore it.
As an exercise, we are going to pretend that an earlier call instruction exists, meaning that the bytes 48 ff 15 would match the wrong call instruction. To get around this, we can define bytes that are before or after the call instruction we are interested in.
If we decide to match the bytes of the nop instruction after the call, we can simply define the bytes 0f 1f.
To do this, we need to define two things: the pattern mask and the pattern bytes. The mask specifies which bytes must match and which ones can be ignored. In this case we would define:
-
Pattern mask: xxx????xx
-
Pattern bytes: 48 ff 15 00 00 00 00 0f 1f.
We are essentially saying: we want to find a call instruction to an address relative to RIP and a nop instruction afterwards. Given that the match points a few bytes before the instruction we want, we need to add an offset, which in this case is 7.
This way, we specify the exact return address we want to use in a way that will likely be valid across all versions of KernelBase.dll. The final code would look like this:
       set_frame_info(
        &callstack[i++],
        L"KernelBase.dll", // DLL name
        0, // function name hash, not used
        "ProcessIdToSessionId", // function name
        "xxx????xx", // pattern mask
        (PBYTE)"\x48\xff\x15\x00\x00\x00\x00\x0f\x1f", // pattern bytes
        7); // offset
If you don’t want to do all this work or are worried about compatibility across versions, you can simply define the DLL, the function name, and a small offset so that it looks like a valid address.
Pros and Cons
Now that we understand the general idea of the technique, let’s review the Pros and Cons.
Pros:
-
It gives you complete control over the stack layout, which hinders fingerprinting
-
Works for both syscalls and APIs
-
Supports x64, x86 and WoW64 (via WOW32Reserved)
-
Is very easy to use and import into your existing tooling
-
It does not rely in ROP gadgets (which can be unreliable), sacrificial threads (which are a bit noisy) nor callbacks (which create predictable call stacks)
Cons:
-
The technique is not thread safe, although this can be fixed by using a simple mutex.
-
When you define a fake call stack, the target function might not be found on older/newer versions because DLLs change from version to version. (If that happens, the frame is just ignored.)
-
If the first function on your fake call stack has a ridiculously small stack frame, and you call a syscall/API that takes many arguments, the parameters that are stored on the stack could overwrite the return address of that stack frame, messing up how your call stack is interpreted by security tools. Nonetheless, this is unlikely and should come up while testing your code.
-
A security solution could look for hardware breakpoints with a handler on unbacked memory.
-
Setting and removing the hardware breakpoint requires the usage of NtGetContextThread and NtSetContextThread, meaning that two “unsafe” syscalls will be called before and after each “safe” syscall. These two syscalls are made by jumping directly to the ‘syscall’ instruction with an invalid call stack (I.e., indirect syscalls). Alternatively, this could be done by abusing windows callbacks, as explained in this blogpost by Chetan Nayak, which would create a valid call stack.
Conclusion
While many of the concepts described in this post have already been discussed, people most often just discuss a technique and leave it at the PoC. The idea here was to develop an actual implementation that is reliable, easy to use, and (somewhat) stealthy.
Defenders have tremendously improved their detection capabilities and forced us to continuously increase the complexity of our tradecraft, pushing the cat and mouse game even further.
I hope this makes writing offensive security tooling a bit easier... until defenders adapt and detect this as well.
You can find the code here.
