Reversing and Exploiting with Free Tools: Part 13
In part 12, we completed the ROP bypass of the DEP in 64 bits. In this part, we’ll analyze and adapt the RESOLVER for 64 bits.
Resolution of the 64-Bit Exercise
As a quick point of clarification, the shellcode is not mine. However, it is quite public, so it was simply adapted for this example.
Complete Solution Script
Just to mix things up a bit, let’s start out by looking at the complete solution that concludes by running NOTEPAD.

Now, let’s see how it works.
Above we can see the shellcode with the resolver that will be explained later.
There is also gadget that’s been changed:
rop+=struct.pack("<Q",0x1400060b7) # ADD RAX, 0x20 # CHANGED to have more space Initially, this gadget was adding 0x28 to RAX before running. It was altered to instead only add 0x20 in order to conserve space.
Recall from previous parts of the series that the memcpy does not copy everything we send to the space which is reserved in the heap with VirtualAlloc.

Instead, it only allocates and copies 0x64 bytes, which avoids wasting space.
We see in this newly written code that the memmove is going to copy in the reserved area created in the heap. It is also the one that is going to prepare everything to implement the final shellcode. We’ll see all of this upon execution.
The shellcode is in the stack below the ROP without execution permission. Why don’t we put it to the shellcode in the heap, instead of that code directly and execute it?
The answer is because it doesn't fit. We already saw that the space in the heap only reserves 0x64 bytes. We lose the first 0x20 when we jump, so we only have 0x44 bytes left.
Let's run it and then go into further explanation.
When we run the script, it stops at the breakpoints that were put in.

Then we’ll allocate the 0x64 bytes.

We can see that it actually allocates more than 0x64. Unfortunately, the problem is that it strictly copies only 0x64 bytes.


Let's not forget that the rop breaks some bytes from the beginning and to jump we have to avoid them. The only thing that will work is adding RAX 0x20 to the gadget. However, this leaves little space for the shellcode.
We’ll then trace the shellcode to VirtualAlloc.

We’ve arrived with the correct arguments so we can go to the RET, put the cursor there, and press F4. This ensures it will not trace as much.

This is the GADGET that adds 0x20 to RAX to jump to execute, avoiding the bytes that were broken at the beginning.
Next, we’ll jump to execute.


Now we can see the code made for this exercise. It looks for the shellcode in the stack and copies it below. Though the memmove did not copy it completely because of the copy size limit of 0x64, but we can copy it completely manually.
RSI will have the source.
RDI will be the destination.
And RCX has the size to copy in dwords.
When we get to the REP MOVSD, we’ll copy the shellcode and do a PUSH RDI to save the address of the destination where we’ll copy, which is in RDI.


The above image shows where we can put the cursor. From there, we’ll press F4.

We see that it will call WinExec with the string NOTEPAD as an argument, which will execute the NOTEPAD.
Now, we already have the shellcode to execute, but we’ll run through an explanation first. This is not easily done in x64dbg, so we will run the script and attack with Windbg so we can see the structures and symbols needed. However, before giving it a RUN, we’ll first verify that it executes a NOTEPAD.

We see that the NOTEPAD runs, then goes to ExitProcess and closes.

If we run it without debugging we see that it runs NOTEPAD and closes correctly.
We’ll next attach it with the Windbg to trace the RESOLVER.


After it stops, we’ll run the reload module to load the symbols:
.reload /f
It will then finish downloading all the symbols, which we can have listed out:
lm

Now we have the symbols.

Next, we’ll place a breakpoint.

In order to trace to the shellcode, we can put a Breakpoint in VirtualAlloc.

bp KERNELBASE!VirtualAlloc
We’ll RUN with G and accept the MessageBoxA. By the time VirtualAlloc is called by the program at startup, we can continue with G.

We’ll stop again in VirtualAlloc, but first we must stop in the RET, which is the following stop, so we’ll go there first.
Now we’ve stopped at the RET.

We’ll press G again and now it stops in VirtualAlloc. SHIFT plus f11 is STEP OUT to exit the function just after the RET.

We’ll trace with F11.
Now we’ve arrived at the code written for this exercise.

We’ll keep tracing with F10 to pass the REP MOVS so that it doesn't repeat.
We can now move to the next section, which covers SHELLCODE RESOLVER.
Resolve 64 Bits and Finding the Kernel32 Image Base

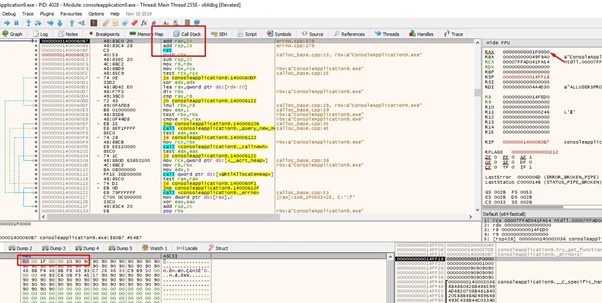
We’ve arrived at CDQ. If the SF sign flag is zero, it sets RDX to zero. Otherwise, it could have been an XOR RDX, RDX

It's zero, so it says RDX=0.
Remember that in 32 bits, the TEB or TIB was pointed to by FS.

In 64 bits, the GS register is used for the TEB.
In 32 bits we could use the command dg fs to see the value of FS.

However, it doesn't work with GS.

However, we have more tricks up our sleeve! We can try the !teb command.

Now we see the content of the TEB. In this instance, its base is 0x21f000 and the address of the PEB is 0x21e000.
If we trace the first instruction, we’ll see it is reading the PEB from the 0x60 field.
mov rax, qword ptr gs:[rdx+60h]
Since we know the address of the TEB—0x21f000—we can use the dt command and see it better.
dt nt!_TEB 0x21f000

We also have a link to show the PEB that will work.
The second instruction is:

We’ll need to read the field that is in the 0x18 offset of the PEB. There is a link we can click to see the list of the PEB.

It reads PEB->Ldr
According to Microsoft, Ldr is a pointer to PEB_LDR_DATA structure that contains information about the loaded modules for the process.
Let’s move on.
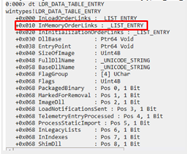
We can click on LDR or list _PEB_LDR_DATA.
We see that in the 0x20 offset it loads InMemoryOrderModuleList
According to Microsoft, InMemoryOrderModuleList, “The head of a doubly-linked list that contains the loaded modules for the process. Each item in the list is a pointer to an LDR_DATA_TABLE_ENTRY structure.”
In some web pages, and even when we did the 32-bit RESOLVER part,
LDR_DATA_TABLE_ENTRY is also called LDR_MODULE. These are both the same, only LDR_MODULE is shorter.
In this case, it is convenient to call it LDR_DATA_TABLE_ENTRY since that way it is listed in the Windbg.
We can see the first field is of _LIST_ENTRY type. As the documentation says, it has its FLINK that points to a similar structure that corresponds to the following module, as it is a linked list.


We see in the image that structures are connected between them, by means of the FLINK and BLINK. FLINK is a pointer to the following structure. Once we find the content of it, we will have the FLINK of the following structure.
mov rsi, [rax + 0x20]
This instruction has us load in RSI=InMemoryOrderModuleList which, as we saw before, is the beginning of the linked list and in turn belongs to the first module of the LDR_DATA_TABLE_ENTRY string.
Those who followed the tutorial of the 32 bits resolver will remember that InLoadOrderLinks was used in the first field. Both InMemoryOrderModuleList and InLoadOrderLinks are lists with the same information about the modules. However, the order in which they are located will change depending on which one you use. In this case we always have our FLINK in the offset 0x10, instead of being in the OFFSET 0x0 of the structure as it was InLoadOrderLinks.

RSI is in the 0x10 offset of the first LDR_DATA_TABLE_ENTRY. In this instance, it's 0x0462fa0.
We can list it in the Windbg.

We can see see that we were at offset 0x10 so 0x10 had to be subtracted in order to list the structure.
dt LDR_DATA_TABLE_ENTRY (0x0462fa0 -0x10)
It corresponds to the executable module, which is always the first one in the chain. We see the ImageBase and its name, as well as the FLINK to the structure of the second module.
This is done programmatically by finding the ESI content, as the LODS instruction reads the ESI content and moves it to EAX.
lods qword ptr [rsi] ds:0x00462fa0=0x0462e10

EAX is again in the offset 0x10 of the second structure. Let’s see which module it corresponds to.

We see that the second LDR_DATA_TABLE_ENTRY corresponds to ntdll.dll and that the third one, pointed by the FLINK, will be 0x463460.
Then EAX moves it to ESI using XCHG.

It then finds the content again using LODS. Naturally, it matches, and will be 0x463460.


It corresponds to kernel32.dll. Since EAX is positioned at offset 0x10, all that’s needed to read the base of kernel32.dll is the addition of 0x20, which will get us to 0x30.

With this it already found the kernel32.dll base, which was the first target to look for.

Finding WINEXEC'S Address
Once the base of Kernel32.dll is found, the steps to find WinExec or the function we want inside kernel32 are as follows:


We will trace part of the code to check that everything corresponds.
The structure where the header starts is called _IMAGE_DOS_HEADER and is in the address of the kernel32.dll image we found. We can see the characteristic MZ the two bytes that are at the beginning in the DOS executables.

We see that the shellcode reads the offset field 0x3c.


It is worth 232 decimal, so 0xe8 (in hexadecimal) is the offset of _IMAGE_NT_HEADERS64.

It then adds the image base to get the address.

In RDX, we’ll find that the address is _IMAGE_NT_HEADERS64.

We’ll then look for the field 0x88. We’ll find it inside OptionalHeader, which is at 0x18.


We can see that 0x70 has _IMAGE_DATA_DIRECTORY64. Adding the 0x18 of
_IMAGE_OPTIONAL_HEADER64 brings us to 0x88, as the shellcode reads.
The following image shows an ARRAY of _IMAGE_DATA_DIRECTORY:


The first is the offset to the EXPORT TABLE and its first field is the offset to the direction.

It then adds the base to obtain the direction of the EXPORT TABLE.


It reads the AddressofNames from offset 0x20.
AddressOfFunctions is an RVA that points to an array of function addresses, which, oddly enough, are also RVAs.
AddressOfNames points to a list of function names. Since these addresses are RVAs, they must be added to the image base to get the function name and address.
AddressOfNameOrdinal is an RVA to a list of ordinals. The ordinals are not RVAs, but are just numbers that represent exported functions.
So, there are three AddressOfFunctions arrays at 0x1c, AddressOfNames at 0x20 and AddressOfNameOrdinals at 0x24.


We can see that RSI has the table or array of names.

In order to find the string with the name for each one of the table entries, we have to add the base. It will do so, going around the table reading the offset, adding the base, and comparing with WinExec. As a note, if we wanted another function, we would simply need to swap out the name of the one we would want to find.
Let's see what the little table points to first.

Each of these offsets plus the base points to the name of an exported function. It makes a loop through the table, comparing each string with WinExec.

We can put a BREAKPOINT after JNE and press RUN to stop when it finds the name.
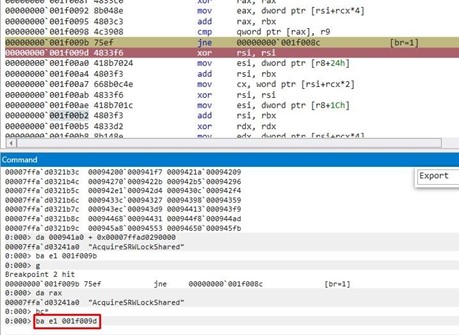
Here’s what we see when it stops.

It increases RCX, which is the table index. That means the position in the table for WinExec is RCX=0x60e.

Remember that we add 0x20 to r8 and then the base to find the name table. If we add 0x24 and then the base we’ll find the ordinal table.


Taking these values in the unlooped ordinal table and using the index value that is in RCX of the name table position, we can find the number of the function of the little table.


The number we find is also 0x60e, which was used in the last table to find the offset of the WinExec function.


So, RSI + RCX*4 gives us the offset of WinExec.

We’ll add this to the base and this will give us the virtual address of WinExec.
Calling WINEXEC

And that's it! We’ll simply arrange a NOTEPAD string to pass and jump to run WinExec with the "NOTEPAD" argument.


Then, if we pass the fall with f10 and continue it calls ExitProcess to close it.

We can see that the NOTEPAD is running!

This concludes the 64 bits RESOLVER. In part 14, we’ll discuss how to analyze the difficulty of creating a rop depending on the scenario.


Explore the Rest of the Reversing & Exploiting Series
Head to the main series page so you can check out past and future installments of the Reversing & Exploiting Using Free Tools.